
Immediate Action Steps and Diagnostic Techniques for Leaking Pipes
When a pipe ruptures or springs a hidden pinhole leak, panic is your worst enemy. Taking methodical, rapid action will save your home from thousands of dollars in water damage. The second you notice water leaking from a ceiling, pooling under a vanity, or trickling behind an appliance, execute these primary containment steps immediately.
First, shut off the water supply. If the leak is isolated to a specific fixture—such as a sink faucet, toilet supply line, or washing machine—turn the local shutoff valve clockwise until it is fully hand-tight. If you cannot reach the local valve or the leak is on a main branch, head straight to your home’s main water shutoff valve. In Utah homes across Salt Lake City, Davis County, and surrounding areas, this valve is typically located in the basement near the front wall, in a crawlspace, or inside a ground utility box near the street.
Next, depressurize the plumbing system. Shutting off the main valve stops incoming water pressure, but several gallons of pressurized water remain trapped inside your home’s pipes. Relieve this internal tension by opening both the highest faucet (such as a second-floor bathroom sink) and the lowest faucet (like a basement utility sink or outdoor spigot) in your home simultaneously. This allows gravity to pull the remaining water safely out through the drains rather than pushing it through the damaged pipe opening.
Electrical safety must be your next immediate priority. Water is an excellent conductor of electricity, and standing water combined with live outlets creates a life-threatening hazard. Before stepping into flooded rooms or reaching under saturated cabinets, use a non-contact voltage tester to verify that surrounding electrical outlets, appliances, and wiring are not energized. If there is any doubt, turn off the main circuit breaker controlling power to that zone of the home.
Once the area is safe and the water flow has stopped, prepare the pipe surface for diagnostic inspection or patching. Use clean towels to dry the pipe exterior completely. Dirt, scale, oxidation, and residual moisture prevent adhesives, tapes, and rubber clamps from making a watertight seal. For detailed diagnostic strategies on recognizing subtle early warnings before a catastrophic failure occurs, read our guide on Spotting the Drip A Guide to Water Leak Detection.
Identifying Pipe Materials and Finding the Leak Source
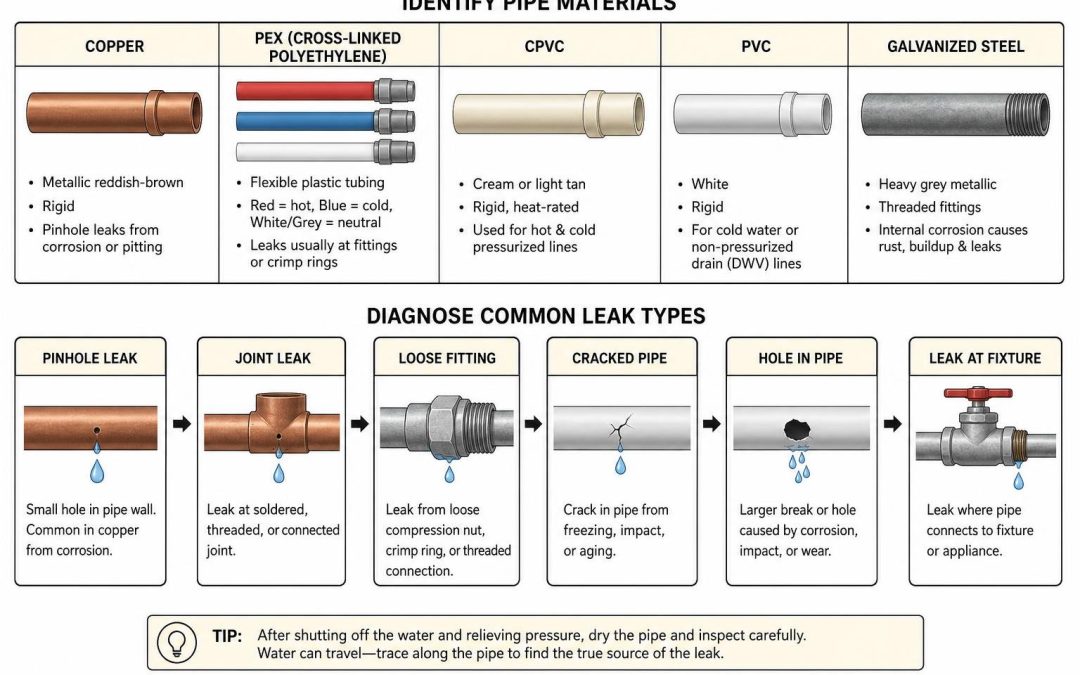
Before you can choose the right temporary patch or permanent fix, you must accurately identify the material of the leaking pipe. Residential plumbing systems utilize several distinct materials, each with unique characteristics:
- Copper: Metallic reddish-brown rigid pipe commonly found in homes built over the last several decades. Pinhole leaks in copper lines are usually caused by internal pitting corrosion from chemistry imbalances or mineral friction.
- PEX (Cross-Linked Polyethylene): Flexible plastic tubing widely used in modern plumbing. PEX is color-coded: red tubing usually signifies hot water lines, blue indicates cold water lines, and white or grey is used for neutral distribution. Leaks on PEX lines almost always occur at loose crimp rings or fitting connections rather than along the pipe body.
- CPVC and PVC: Rigid plastic piping. CPVC is cream or light tan-colored, heat-rated, and used for hot and cold pressurized supply lines. Standard white PVC is generally restricted to cold-water lines or non-pressurized drain, waste, and vent (DWV) piping.
- Galvanized Steel: Heavy grey metallic pipe with threaded fittings found in older historical homes across the Salt Lake Valley. Galvanized steel corrodes from the inside out, leading to rust build-up, severe flow restriction, and structural failure.
Finding the exact origin of a leak can be trickier than it seems because gravity causes escaping water to travel along the exterior of joists and pipes before dripping down onto floors or drywall. If a leak is concealed behind walls or beneath flooring, professional plumbing technicians use advanced acoustic listening equipment to pinpoint leaks by detecting the ultra-high frequency sound waves generated by pressurized water escaping a pipe cavity. To learn how acoustic sensors locate hidden plumbing breaches without tearing down your drywall, explore our article on The Sound of Silence Pinpointing Water Leaks Acoustically.
Emergency Tools and Materials Needed
To respond effectively to sudden plumbing emergencies, every homeowner should keep a dedicated leak repair kit on hand. Having these basic tools readily accessible can mean the difference between a quick five-minute fix and thousands of dollars in water damage:
- Pipe Wrenches and Adjustable Wrenches: Essential for tightening loose coupling nuts, P-trap connections, or mechanical clamps.
- Medium-Grain Sandpaper or Emery Cloth: Used to clean, score, and roughen metal and plastic pipe surfaces so epoxy putties and repair tapes can form a strong bond.
- Nitrile or Latex Gloves: Protects your skin from harsh chemical resins when mixing two-part epoxy putties or handling water-activated fiberglass wraps.
- PEX Crimp Tool and Go/No-Go Gauge: Vital for checking and re-compressing loose copper crimp rings on PEX pipe connections.
- Tubing Cutter or Hacksaw: Necessary for neatly cutting away damaged sections of pipe during permanent replacement.
- Non-Contact Voltage Tester: Ensures your safety around water saturated near outlets or appliances.
Essential Methods for Temporary Leaking Pipe Repair
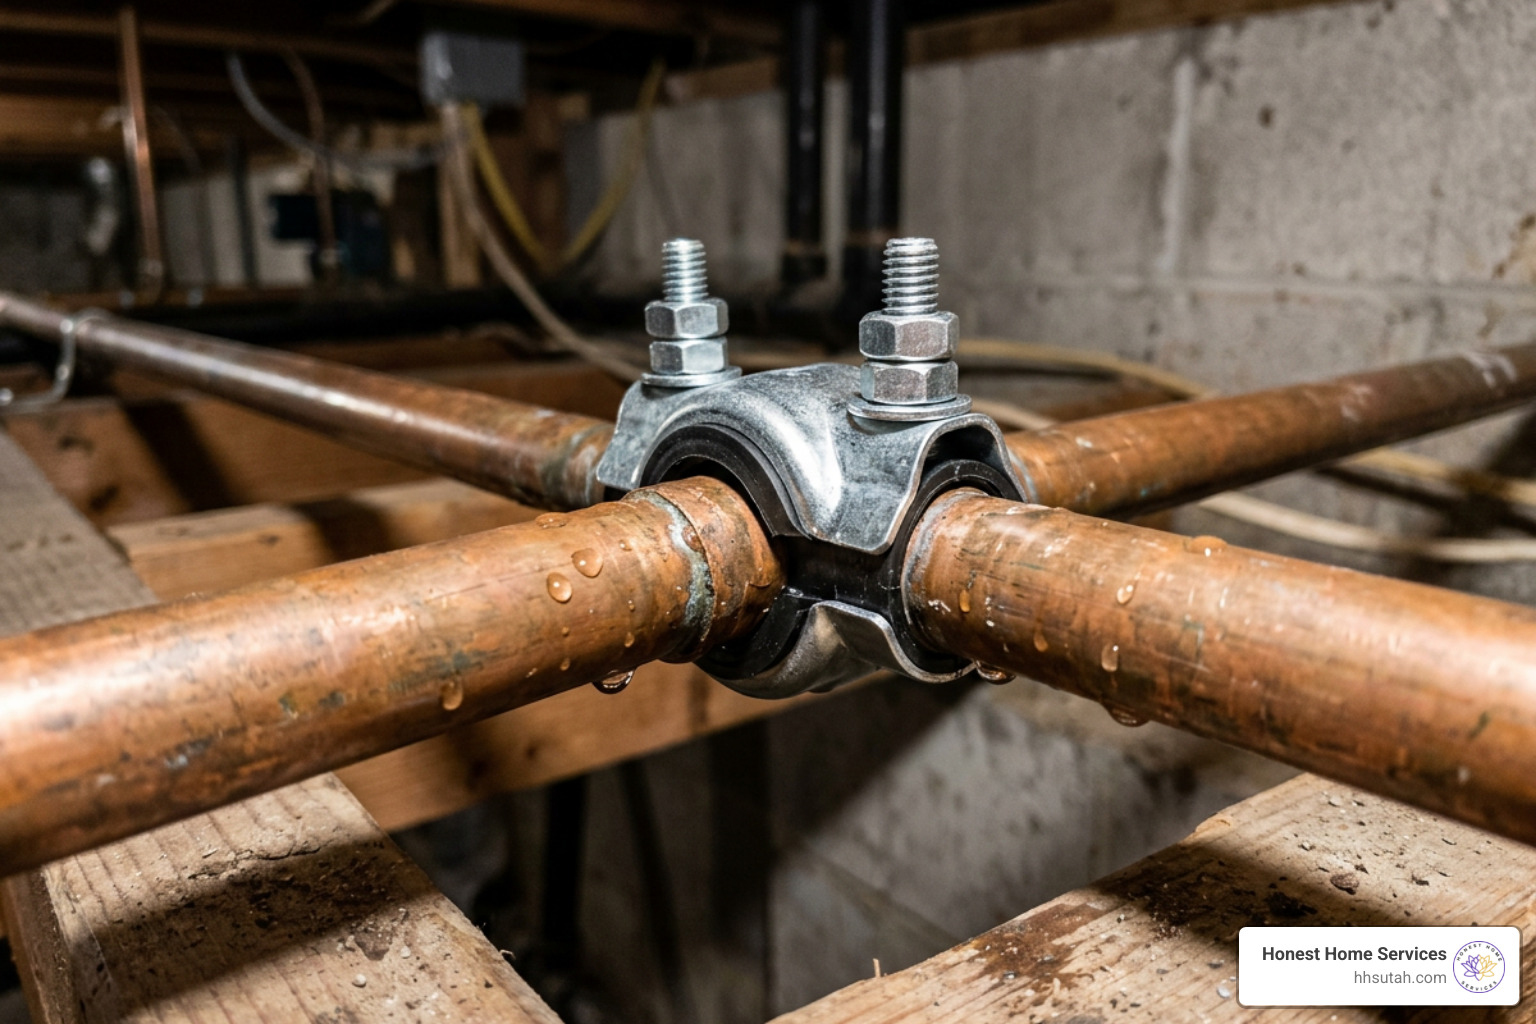
It is crucial to understand that temporary DIY repairs—such as clamps, wraps, and epoxy putties—are emergency containment measures. They are designed to stop active flooding and buy you valuable time while you arrange for proper permanent repairs. Because normal home plumbing operates under continuous water pressure up to 50 to 70 PSI, temporary fixes can weaken over time due to pressure fluctuations and thermal expansion. As noted in comprehensive plumbing industry standards like The Ultimate Guide to Repairing a Leaking Water Line, emergency patches should ideally be replaced with permanent solutions within 24 to 48 hours.
Step-by-Step Guide to Temporary Fixes for a Leaking Pipe
Depending on the material, location, and severity of the rupture, choose one of these proven temporary repair methods:
Method 1: Installing a Pipe Repair Clamp
Pipe repair clamps consist of a flexible metal sleeve lined with a heavy-duty thick neoprene rubber gasket. They are the single most reliable temporary fix for pinhole leaks and small cracks on straight sections of metal or rigid plastic pipe.
- Step 1: Turn off the water supply and thoroughly dry and clean the pipe surface using sandpaper to remove rust or burrs.
- Step 2: Position the thick rubber pad directly over the center of the leak.
- Step 3: Wrap the metal clamp sleeve over the rubber pad and tighten the retaining carriage bolts evenly using a wrench. Avoid overtightening, which can crush thin-walled or weakened pipes.
Method 2: Applying Two-Part Epoxy Putty
Epoxy putty stick is a moldable, hand-kneadable compound engineered to bond exceptionally well to copper, steel, PVC, and CPVC pipes.
- Step 1: Isolate and depressurize the water line, then dry the surface completely. Sand the pipe lightly to create mechanical grip.
- Step 2: Cut off the required amount of epoxy putty and knead it thoroughly between gloved fingers until it achieves a uniform, single color without streaks (usually 1 to 2 minutes).
- Step 3: Firmly press the putty over the leak, pushing a small amount into the crack or pinhole, and taper the edges flat against the surrounding pipe.
- Step 4: Allow the epoxy compound to cure undisturbed for at least 15 to 30 minutes before restoring low water pressure.
Method 3: Wrapping with Self-Fusing Silicone Tape
Self-fusing silicone tape contains no adhesive sticky backing; instead, it chemically fuses to itself when stretched under tension, forming a seamless, watertight rubber sleeve.
- Step 1: Wipe the leaking joint or pipe section dry.
- Step 2: Anchor the tape a few inches upstream of the leak site.
- Step 3: Pull the tape firmly—stretching it to approximately twice its relaxed length—and wrap it tightly around the pipe, overlapping each turn by at least 50%.
- Step 4: Wrap two inches past the leak in both directions to ensure a tight compression seal capable of resisting standard line pressure.
Method 4: Water-Activated Composite Resin Cast Wraps
Heavy-duty fiberglass wrap tapes impregnated with water-activated polyurethane resins—similar to products referenced in Stop It Pipe Repair System | Leak Sealing Tape | InduMar—offer extreme structural reinforcement. When submerged in water for 20 seconds and wrapped tightly over an epoxy-plugged leak, these composite wraps cure into a rock-hard, pressure-resistant shell within 30 minutes.
For drain lines, P-traps, and non-pressurized waste pipes, review our complete guide on Patch It Up Your Complete Guide to Fixing Any Drain Pipe Leak.
Comparing Temporary Patch Options
| Repair Method | Best Pipe Material Compatibility | Max Pressure Resistance | Cure Time / Turn-On Time | Primary Advantage |
|---|---|---|---|---|
| Mechanical Pipe Clamp | Copper, Galvanized Steel, PVC | Up to 150 PSI | Immediate (No waiting) | Fastest installation on straight pipe sections |
| Self-Fusing Silicone Tape | Copper, PEX, CPVC, Smooth Joints | Up to 100 PSI | Immediate (No waiting) | Excellent for awkward angles, joints, and elbows |
| Two-Part Epoxy Putty | Copper, PVC, CPVC, Cast Iron | Up to 300 PSI | 15 – 30 Minutes | Fills irregular cracks, pitted holes, and tees |
| Water-Activated Composite Wrap | All Pipe Materials | Up to 400 PSI | 30 – 45 Minutes | Creates a rock-hard structural shell over large ruptures |
Permanent DIY Solutions and When to Call a Professional

While temporary patches stop active flooding, achieving permanent peace of mind requires cutting away damaged pipe sections and splicing in pristine replacement materials.
For accessible copper or CPVC lines, the most user-friendly permanent DIY solution is a push-to-connect slip coupling (such as SharkBite fittings). These stainless-steel teeth and O-ring fittings hold up to 200 PSI without requiring flame soldering or specialized crimping tools.
- Step 1: Shut off the water, drain the line, and mark a 2-inch section around the leak.
- Step 2: Use a smooth wheel pipe cutter to slice cleanly through the damaged section.
- Step 3: Use a deburring tool and emery cloth to smooth the cut pipe ends internally and externally. Removing sharp burrs prevents damaging the internal rubber O-ring seal during insertion.
- Step 4: Slide the push-to-connect slip fitting onto one pipe end using its release tool, align the opposite pipe, and slide the fitting back into position until it locks at the designated depth mark.
For detailed copper-specific pinhole repair strategies and traditional soldering advice, check out our guide on Holy Copper The Best Ways to Fix a Pinhole in Copper Pipe. Additional detailed repair methodologies can also be reviewed in resources such as How to Fix a Leaky Pipe: Emergency Stops and Permanent Repairs (2026) and Pipe Leak Repair: How to Fix Leaking Plumbing.
Best Practices for Testing and Cleanup After Leaking Pipe Repair
Once a repair is complete—whether temporary or permanent—testing must be conducted systematically:
- Slowly open the main water valve to prevent hydraulic shock (water hammer) from rattling newly installed fittings.
- Keep a dry paper towel wrapped around the repaired fitting while the line pressurizes. Even micro-droplets of water will show up immediately on the paper towel.
- Leave the line under full static pressure for at least 30 minutes while inspecting for subtle weeping.
After verifying a watertight seal, turn your attention to cleanup and mold remediation. Moisture trapped inside enclosed vanities or beneath floorboards turns into toxic mold rapidly. Remove all items from under affected sink cabinets and use high-powered floor fans or dehumidifiers to dry particleboard and subflooring completely. Disinfect all non-porous hard surfaces with a mild bleaching solution (mixing 1 ounce of liquid bleach per gallon of hot water) to eradicate lingering fungal spores.
When Professional Plumber Intervention Is Required
While minor, exposed pinhole leaks under a kitchen sink are manageable for handy homeowners, many plumbing scenarios carry severe risks and legally or structurally demand licensed professional plumbing intervention:
- Leaks Inside Walls or Ceilings: Cutting into drywall blindly runs the risk of puncturing adjacent gas lines or high-voltage electrical cables.
- Slab Leaks: Leaks occurring beneath or within concrete foundation slabs require non-invasive electronic location, precision jackhammering, or overhead pipe rerouting.
- Main Water Line Breaks: Ruptures on underground main service supply lines entering the home require heavy excavation and specialized municipal coordination.
- Galvanized Steel Line Failure: Old galvanized steel pipes crumble when gripped by wrenches, turning a simple fitting replacement into a complete home collapse hazard.
- Excessive System Pressure: If your incoming municipal water pressure exceeds 80 PSI, temporary fixes will repeatedly blow out until a professional installs a pressure-reducing valve (PRV).
Common Causes, Prevention, and Repair Costs
Understanding why pipes leak in the first place is the best defense against catastrophic future floods. The most frequent causes of pipe degradation include:
- High Water Pressure: Municipal water lines occasionally spike above normal residential limits. Running home plumbing at pressures above 80 PSI inflicts continuous stress on pipe joints, solder seams, and appliance flex hoses.
- Hard Water Mineral Deposits: Across Northern Utah—including Salt Lake City, Davis County, and Park City—hard water containing high concentrations of calcium and magnesium causes scale buildup and accelerated galvanic corrosion inside copper and steel lines.
- Freezing Temperatures: During harsh Utah winter months, exposed water lines in uninsulated crawlspaces, exterior walls, or garages freeze. As water freezes into ice, it expands with immense force, tearing open metal and plastic pipes.
- Aging Piping Infrastructure: Galvanized iron and thin-wall copper pipes have a finite lifespan and eventually succumb to wall-thinning pinholes over time.
To learn more comprehensive preventative maintenance steps for safeguarding your home supply lines, read our article on Fixing the Flow Essential Steps for House Water Leak Repair.
When considering the cost of leaking pipe repair, expenses depend entirely on accessibility, location, and the extent of required restoration. Simple accessible repairs under a bathroom vanity carry minimal material expenses for DIYers, whereas hidden slab leaks or main underground line rerouting require extensive professional labor, specialized diagnostic machinery, and structural restoration work. Investing in timely professional repairs always saves money compared to replacing water-logged flooring, ruined cabinets, and moldy drywall.
Frequently Asked Questions About Leaking Pipe Repair
What should I do immediately when I discover a leaking pipe?
Immediately shut off the main water valve to stop active incoming pressure. Next, depressurize the plumbing system by opening your home’s highest and lowest faucets. Verify electrical safety around standing water using a non-contact voltage tester, thoroughly dry the pipe surface, and apply an emergency temporary clamp or epoxy patch while contacting a professional plumber.
How long does a temporary patch on a leaking pipe last?
Temporary repairs—including rubber pipe clamps, silicone self-fusing tape, and epoxy putties—are emergency measures designed to hold for 24 to 48 hours. Because domestic plumbing experiences continuous pressure changes and thermal fluctuations, temporary patches will eventually degrade and fail if not replaced with a permanent spliced pipe repair.
How much does professional leaking pipe repair typically cost?
Professional repair costs vary depending on the leak’s location, pipe material, and accessibility. A straightforward repair on an exposed basement copper line requires significantly less labor and time than detecting and repairing a hidden slab leak beneath concrete foundations or replacing crumbling galvanized piping inside finished drywall. Contacting a reputable licensed plumber for an upfront, on-site assessment is always the best way to determine precise project requirements.
Conclusion

A leaking pipe is one of the most urgent threats a homeowner can face. Left unaddressed, even a minute pinhole leak can waste thousands of gallons of water, cause structural wood rot, and invite toxic mold growth into your living space within 48 hours. By acting quickly—shutting off your water main, draining line pressure, and applying effective temporary containment measures—you can stop active flooding and protect your property.
However, temporary patches are only the first step. To ensure your home remains safe, dry, and protected for years to come, permanent repairs executed by experienced professionals are essential.
At Honest Home Services, our team of licensed, expert technicians delivers fast, reliable leaking pipe repair and advanced leak detection throughout Northern Utah—including Salt Lake City, Layton, Draper, Park City, and surrounding communities. We pride ourselves on transparent pricing, 24/7 emergency availability, and guaranteed customer satisfaction.
Don’t let a minor drip turn into a major disaster. For professional assistance and permanent solutions, visit our comprehensive resource center for Salt Lake City Pipe Repair or contact Honest Home Services today!