

Why That Tiny Drip Could Cost You Thousands
Knowing how to fix a pinhole in copper pipe can save you from a surprisingly expensive disaster. Here’s a quick summary of your options:
Quick Answer: How to Fix a Pinhole in Copper Pipe
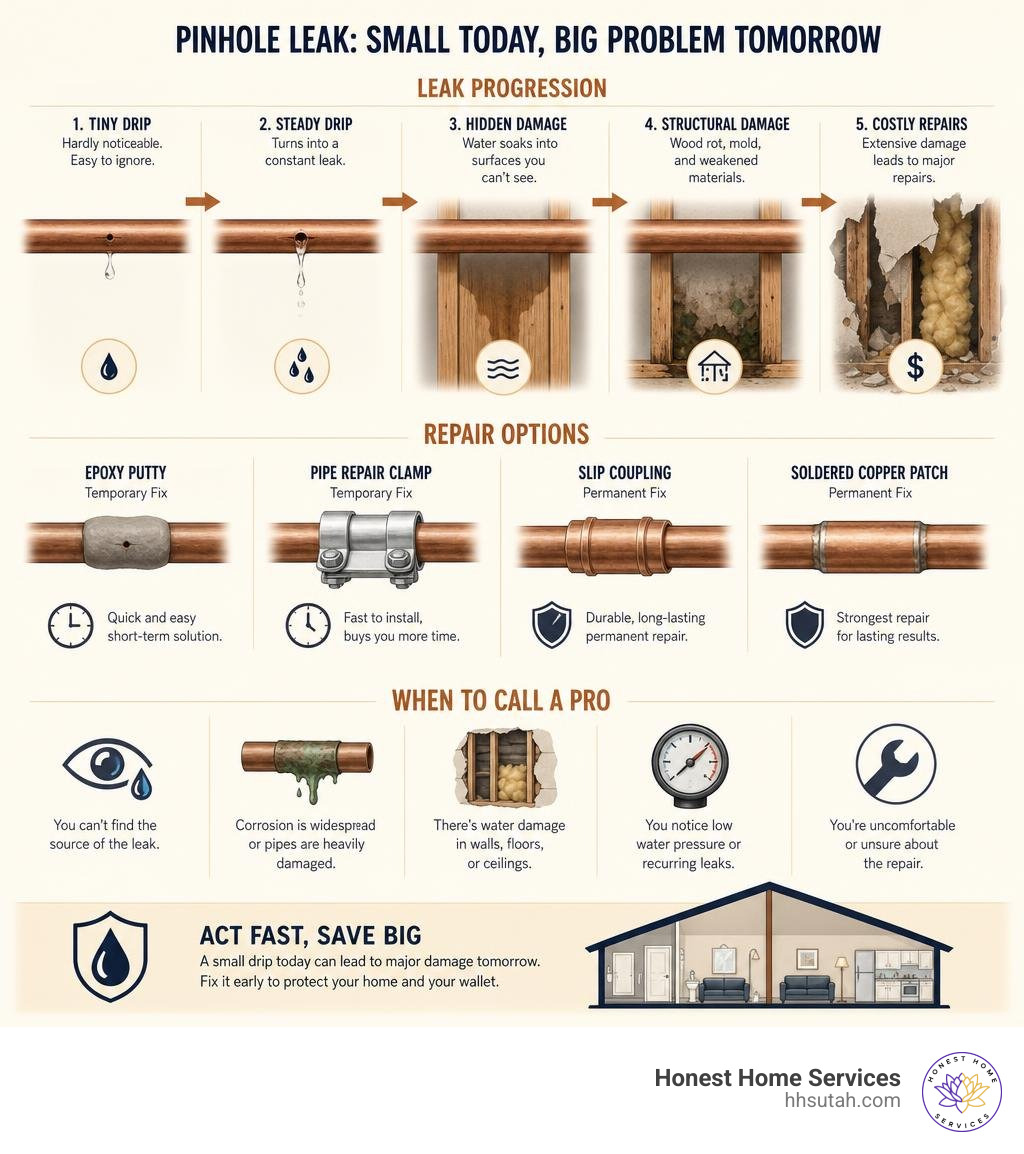
| Method | Type | Skill Level | Time |
|---|---|---|---|
| Epoxy putty | Temporary | Beginner | 30–60 min cure |
| Pipe repair clamp | Temporary | Beginner | 15–30 min |
| Slip coupling | Permanent | Intermediate | Under 1 hour |
| Soldered copper patch | Permanent | Advanced | 1–2 hours |
- Turn off the main water supply and drain the line.
- Dry and clean the pipe surface around the leak.
- Choose a method — epoxy putty or a clamp for a quick fix; a slip coupling or soldering for a lasting repair.
- Restore water slowly and inspect for leaks for at least 5–10 minutes.
Copper pipes can last anywhere from 20 to 70 years, but even a well-maintained system can spring a pinhole leak — and what starts as a tiny mist of water can silently soak drywall, rot framing, and fuel mold growth before you ever notice it.
One pinhole is often the first sign of deeper corrosion. That’s why acting fast matters.
At Honest Home Services, we’ve spent over 20 years fixing pinhole leaks and copper pipe problems for homeowners and businesses across Northern Utah — and we know exactly when a quick repair is enough and when more is needed. In this guide, we’ll walk you through every option so you can make the right call.
What Causes Pinhole Leaks in Copper Plumbing?
To understand how to stop a pinhole leak, you first have to understand why it happened. Under magnification, a pinhole is rarely a clean, simple circle. Instead, it typically forms at the bottom of a tiny, localized crater where the pipe’s protective interior film has been compromised. This is known as pitting corrosion, and it attacks the copper from the inside out.
Several factors can accelerate this internal breakdown:
- Corrosive Water Chemistry: Water with high acidity (a pH below 6.5) is highly aggressive. It dissolves the thin, protective mineral film that naturally coats the inside of your copper pipes. When this barrier is gone, the raw copper is exposed to rapid degradation. You can learn more about how this chemistry works from this detailed breakdown of corrosive water chemistry.
- Chloramines and Chlorine: Many municipal water treatment plants use chlorine or chloramines to disinfect drinking water. While great for keeping water safe to drink, chloramines are highly oxidizing and can aggressively attack copper, especially near water heaters where high temperatures accelerate chemical reactions.
- High Water Pressure and Velocity: Water pressure above 80 PSI (pounds per square inch) puts constant mechanical stress on your pipe walls. According to the Copper Tube Handbook, cold-water flow velocities should be kept below 8 feet per second, and hot-water velocities should be kept closer to 5 feet per second. When flow exceeds these limits, it creates erosion-corrosion, physically wearing down the pipe’s interior.
- Unreamed Pipe Ends: During original installation, if a plumber cuts a copper pipe and fails to ream the inside edge, it leaves a sharp internal ridge. This ridge disrupts the smooth flow of water, causing it to spin and create localized turbulence that rapidly erodes the pipe immediately downstream.
- Stray Electrical Currents: In many older homes, the electrical system is grounded to the copper water lines. If there is a fault in the grounding, stray electrical currents can travel through the pipes. This causes electrolytic corrosion, literally pulling copper molecules out of the pipe walls and depositing them elsewhere.
How do you know you have a pinhole leak before a ceiling collapses? Keep an eye out for greenish-blue crusty deposits (called verdigris) on exposed pipes, musty odors behind drywall, damp spots on your trim or ceiling, or an unexplained jump in your monthly water bill. If you suspect a leak, brushing up on DIY Plumbing Fixes Every Homeowner Should Know can help you spot the early warning signs before they turn into a flood.
Tools and Materials Needed to Fix a Pinhole in Copper Pipe
Before you attempt to fix a pinhole in copper pipe, you need to gather the correct gear. Using the wrong tool can turn a minor leak into a complete pipe rupture.
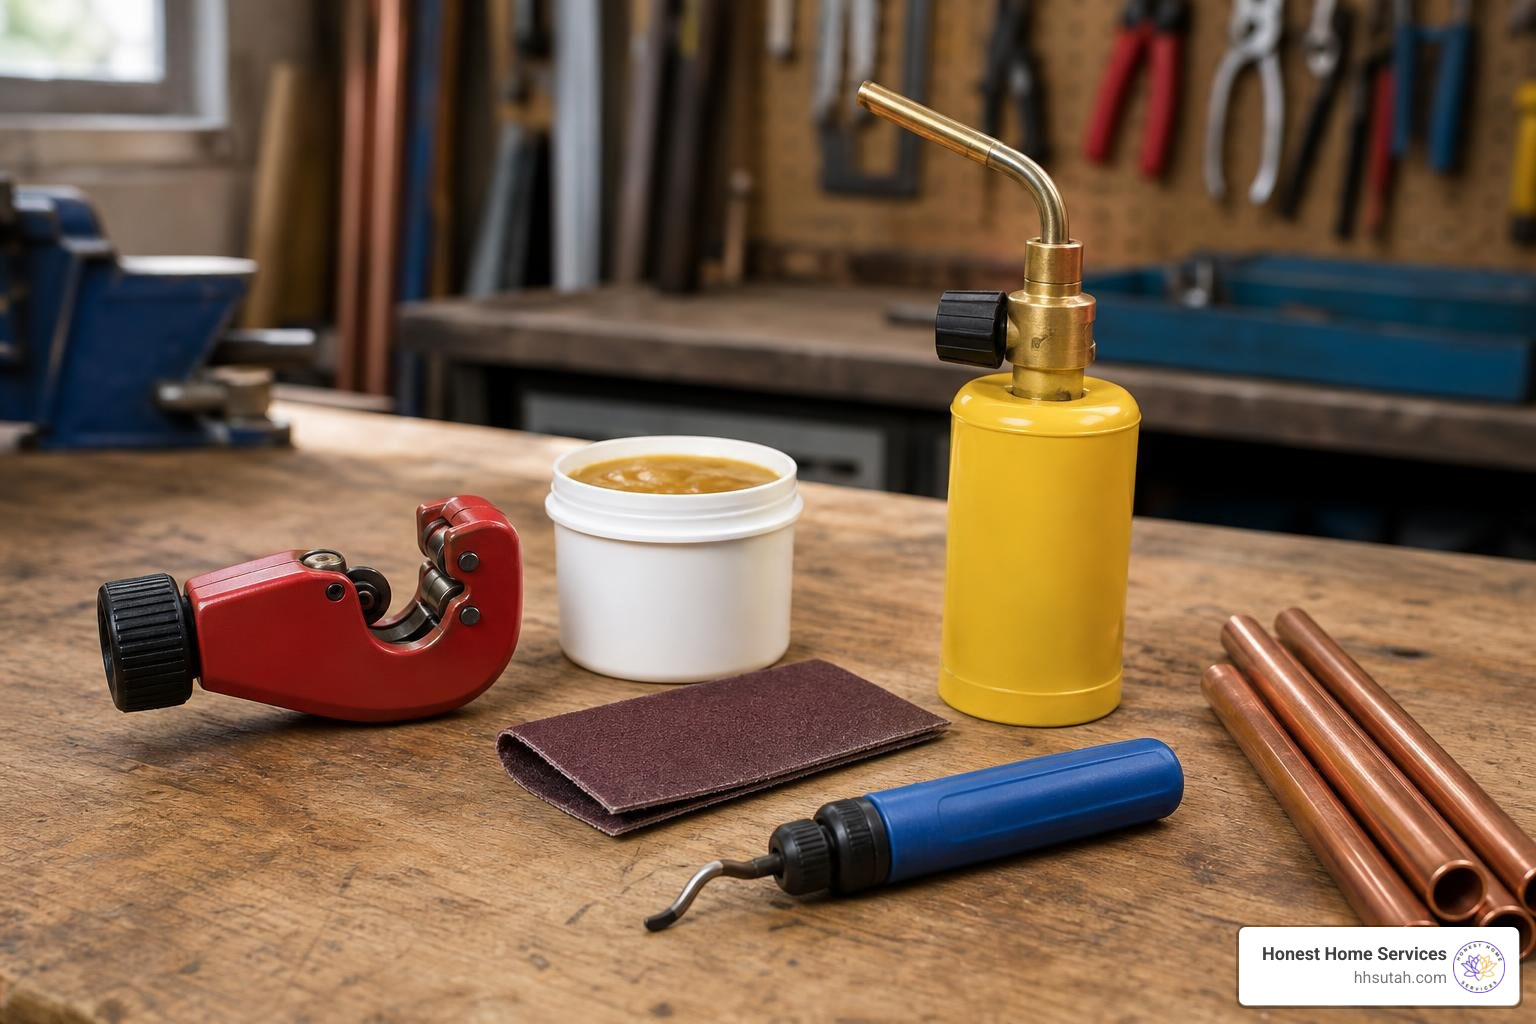
Depending on whether you are doing a temporary patch or a permanent replacement, make sure you have these items on hand:
- Tubing Cutter: Avoid using a hacksaw. A dedicated wheel-style pipe cutter ensures a perfectly square cut, which is vital for a watertight seal.
- Deburring/Reaming Tool: Used to clean the inside and outside edges of the cut pipe.
- Emery Cloth or Sandpaper: Essential for scrubbing the copper pipe down to a bright, shiny finish so that solder, epoxy, or fittings can bond properly.
- Lead-Free Solder and Flux: Standard lead-free solder is legally required for all potable drinking water lines. Acidic flux helps the solder flow into the joint.
- Propane Torch: A standard soldering iron does not get hot enough for plumbing work; you need a gas-powered torch to sweat copper joints.
- Slip Coupling: A specialized repair coupling that does not have an internal stop, allowing it to slide completely onto one pipe end and then slide back over the gap.
- Epoxy Putty: A two-part hand-kneadable putty designed for emergency metal repairs.
- Pipe Repair Clamp: A heavy-duty metallic sleeve with an integrated rubber gasket.
- PEX-a Pipe and Push-to-Connect Fittings: A modern, solderless alternative for rebuilding damaged sections of pipe.
Having these tools ready is half the battle. If you want a deeper look at the exact plumbing setup common in Northern Utah homes, check out The Ultimate Guide to Pipe Repair Salt Lake City.
How to Temporarily Repair a Pinhole Leak
When a pipe starts spraying a fine, atomized mist of water at 2:00 AM, you probably aren’t ready to pull out a blowtorch. You need an immediate temporary fix to protect your home until a permanent repair can be completed.
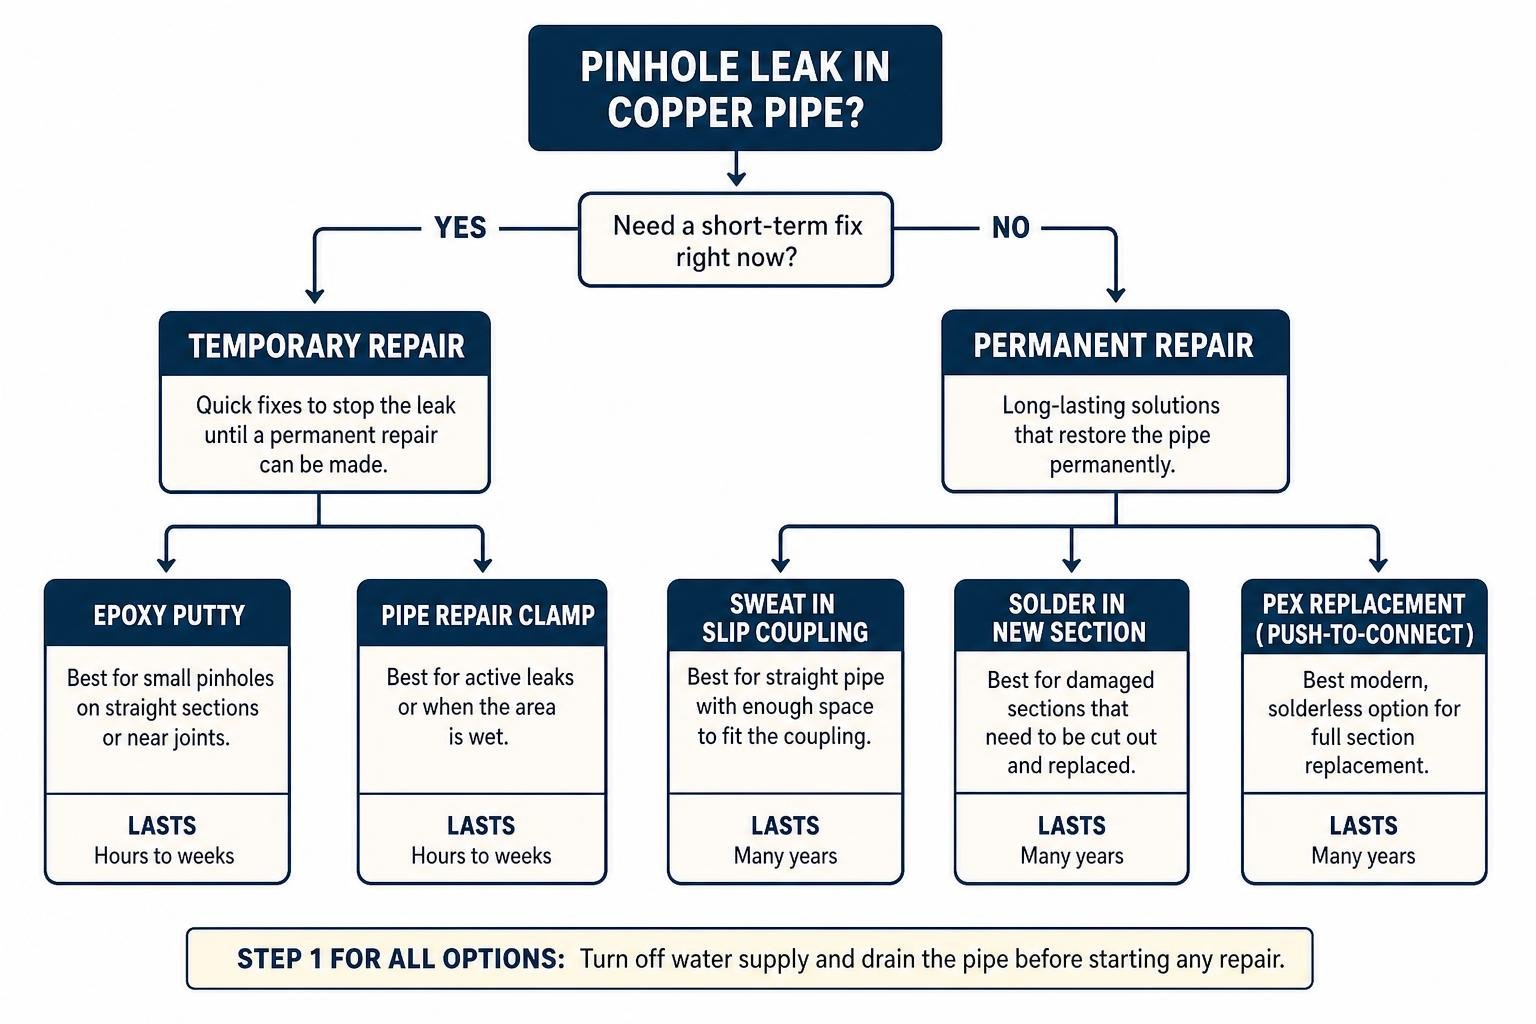
The very first step is to turn off the water supply. Locate your home’s main water shut-off valve and turn it clockwise until it stops. Next, open a faucet at the lowest point of your home (like a basement utility sink) to drain the remaining water out of the lines and relieve pressure. Attempting to apply any patch while the water is pressurized is like trying to change a tire on a moving car — it simply won’t work.
To help you decide which route to take, let’s look at the differences between temporary vs permanent repair methods:
Use Epoxy Putty to Fix a Pinhole in Copper Pipe
Plumber’s epoxy putty is a fantastic, inexpensive tool for sealing tiny pinholes on straight sections or near joints.
- Prep the Pipe: Use your emery cloth or sandpaper to scrub the area around the pinhole. The copper must be completely clean, free of green corrosion, and dry.
- Mix the Putty: Tear off a small portion of the two-part epoxy stick. Knead it thoroughly with your fingers until the separate inner and outer colors blend into one uniform color.
- Apply: Press the mixed putty firmly directly over the pinhole, molding it around the pipe to create a secure collar.
- Cure: Allow the putty to cure completely according to the manufacturer’s instructions (usually 30 to 60 minutes) before turning the water back on.
Note: Epoxy putty is strictly a temporary fix. Over time, the constant expansion and contraction of the pipe as water temperature changes will cause the epoxy seal to fail.
Apply a Pipe Repair Clamp
If the pinhole is on a straight section of pipe, a mechanical repair clamp is an incredibly reliable temporary fix that can easily last several months.
- Select the Clamp: Ensure the clamp matches the diameter of your copper pipe (usually 1/2-inch or 3/4-inch for residential lines).
- Position the Gasket: Center the integrated rubber gasket directly over the pinhole leak.
- Secure the Sleeve: Wrap the metal outer sleeve around the rubber gasket.
- Tighten: Tighten the bolts in a balanced, alternating pattern using a screwdriver or wrench. This ensures even pressure is applied across the entire seal.
That pipe clamps cannot be used on curved pipe elbows or tees. They require a perfectly straight, smooth section of pipe to seal correctly.
How to Permanently Repair a Pinhole Leak
While temporary patches buy you time, they are ticking time bombs. To sleep peacefully at night, you need a permanent solution. This involves cutting out the damaged section of copper and replacing it with fresh, healthy material.
Before choosing your method, consider your comfort level with plumbing. You can compare the safety, cost, and complexity of solderless vs soldered repairs to see which path fits your DIY skills.
Solder a New Copper Section to Fix a Pinhole in Copper Pipe
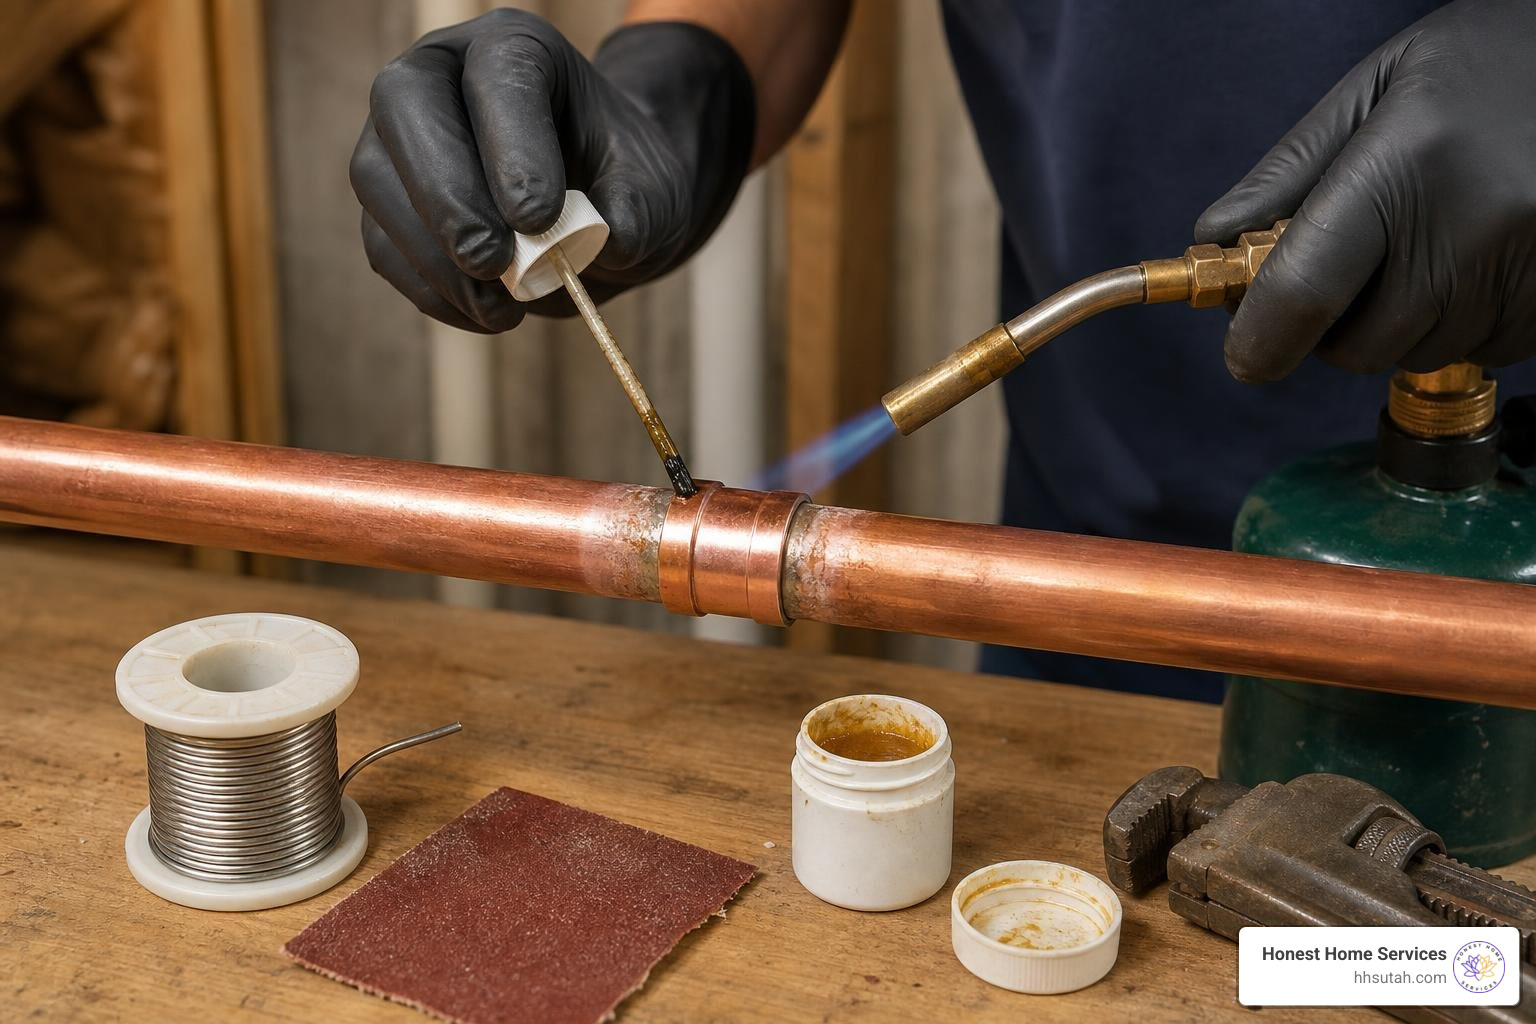
Soldering (or “sweating”) a new piece of copper pipe is the traditional, time-tested method of repair. It creates a molecular bond that is as strong as the original pipe.
- Cut the Pipe: Use your tubing cutter to cut out the corroded section of pipe, removing at least 1 inch on either side of the pinhole.
- Dry the Pipe Completely: This is the most critical step. If there is even a single drop of residual water inside the pipe, it will turn to steam when heated. This steam pocket will prevent the copper from reaching the temperature required to melt the solder, leading to a failed joint.
- Clean and Prep: Clean the outside of the cut pipe ends and the inside of your new copper slip coupling using emery cloth until the metal is bright and shiny. Apply a thin layer of lead-free flux to both surfaces.
- Heat and Solder: Fit the coupling over the gap. Ignite your propane torch and play the flame evenly across the fitting, not the pipe itself. Touch your lead-free solder to the joint on the opposite side of the flame. When the copper is hot enough, capillary action will naturally draw the liquid solder into the joint. Be sure to review proper soldering safety and techniques to avoid fire hazards indoors.
- Cool and Inspect: Let the joint cool naturally. Wipe away any leftover acidic flux residue, which can cause external corrosion if left on the pipe.
Install a Solderless Slip Coupling or Push-to-Connect Fitting
If you don’t want to play with fire inside your walls, modern push-to-connect fittings (such as SharkBite Max) and slip couplings allow you to perform a permanent, professional-grade repair in a fraction of the time.
- Cut and Deburr: Cut out the leaking section of pipe. Use your deburring tool to remove all sharp edges from the inside and outside of the cut copper. If you skip deburring, the sharp edge of the copper can slice the rubber O-ring inside the fitting, causing an immediate leak.
- Measure and Mark: Use a depth gauge tool to mark the correct insertion depth on the copper pipe. This ensures you push the fitting on far enough to seat properly.
- Slide the Slip Fitting: A push-to-connect slip coupling can slide completely onto one end of the cut pipe. Align the pipes, and use a disconnect tool to slide the coupling back over the gap until it meets your depth mark on the other side.
- Transition to PEX (Optional): If you are replacing a longer section of corroded copper, you can use push-to-connect adapters to transition from copper to flexible PEX-a pipe. This is highly recommended if you are dealing with tight spaces where rigid copper is difficult to install.
For homeowners dealing with localized piping failures in Northern Utah, learning about Effective Pipe Leak Repair in Salt Lake City can help you understand how these modern materials protect your home from future ground-movement and chemical corrosion.
When to Call a Professional vs. DIY
Tackling a minor plumbing repair can be incredibly satisfying, but copper pipes require a careful hand. Knowing your limits can save you from a major homeowner’s insurance claim.
You should put down the wrench and call a professional plumber if:
- The Leak is Inaccessible: If the pinhole is behind finished drywall, under a concrete slab, or inside a ceiling cavity, locating and repairing it requires specialized acoustic leak detection and professional extraction tools.
- You Have Multiple Pinholes: If you find two or more pinholes in the same general area, your pipes are experiencing systemic corrosion. Patching one hole will simply cause the water pressure to blow out the next weakest spot down the line.
- The Surrounding Copper is Thin or Green: If the pipe feels brittle, looks paper-thin, or is covered in heavy green scale, it cannot support a repair clamp or withstand the heat of soldering. The entire run needs to be replaced.
If you are on the fence about whether to grab your toolbox or your phone, our guide on DIY Plumbing When to Tackle It Yourself and When to Call a Pro offers a practical checklist. For more severe scenarios, consult When to Call a Professional Plumber The Ultimate Guide to protect your property from catastrophic water damage.
Frequently Asked Questions About Copper Pipe Leaks
How long do copper pipes typically last?
Under normal conditions, copper pipes typically last between 50 and 70 years. However, depending on water chemistry, high velocity, and system workload, they can begin to fail and develop pinholes in as little as 20 to 50 years. If your home was built more than 40 years ago and still has its original copper plumbing, you should regularly inspect exposed lines for signs of systemic corrosion like flaking, pitting, or green discoloration.
Can you solder a copper pipe while it is still wet?
No. You cannot solder a wet copper pipe. Any residual water inside the line will absorb the heat from your torch and turn into steam. This keeps the copper from reaching the 360°F to 420°F required to melt and draw the solder into the fitting. The pipe must be completely drained and dried before you begin.
Does home insurance cover pinhole leak repairs?
Generally, standard homeowners insurance policies do not cover the actual plumbing repair of a pinhole leak, as they view pipe corrosion and aging as normal home maintenance issues. However, most policies do cover the resulting “sudden and accidental” water damage caused by the leak, which includes drying out wet framing, replacing ruined drywall, and professional mold remediation.
Conclusion
A pinhole leak in your copper pipe might look small, but it demands your immediate attention. Whether you choose to apply a temporary clamp to buy some time or install a permanent solderless slip coupling, acting quickly is the key to preventing thousands of dollars in structural water damage.
If you are dealing with recurring leaks, suspect systemic corrosion in your home, or simply want the peace of mind that comes with a guaranteed repair, we are here to help. At Honest Home Services, we provide honest, reliable, and affordable plumbing solutions across Northern Utah — including Salt Lake City, Layton, Draper, and the surrounding areas. Our local, expert technicians are backed by our guaranteed customer satisfaction and are available 24/7 for emergency support.
Don’t let a tiny drip compromise your home and peace of mind. Schedule professional pipe repair services today and let us fix it right the first time!