

What You Need to Know Before You Change Out a Water Heater
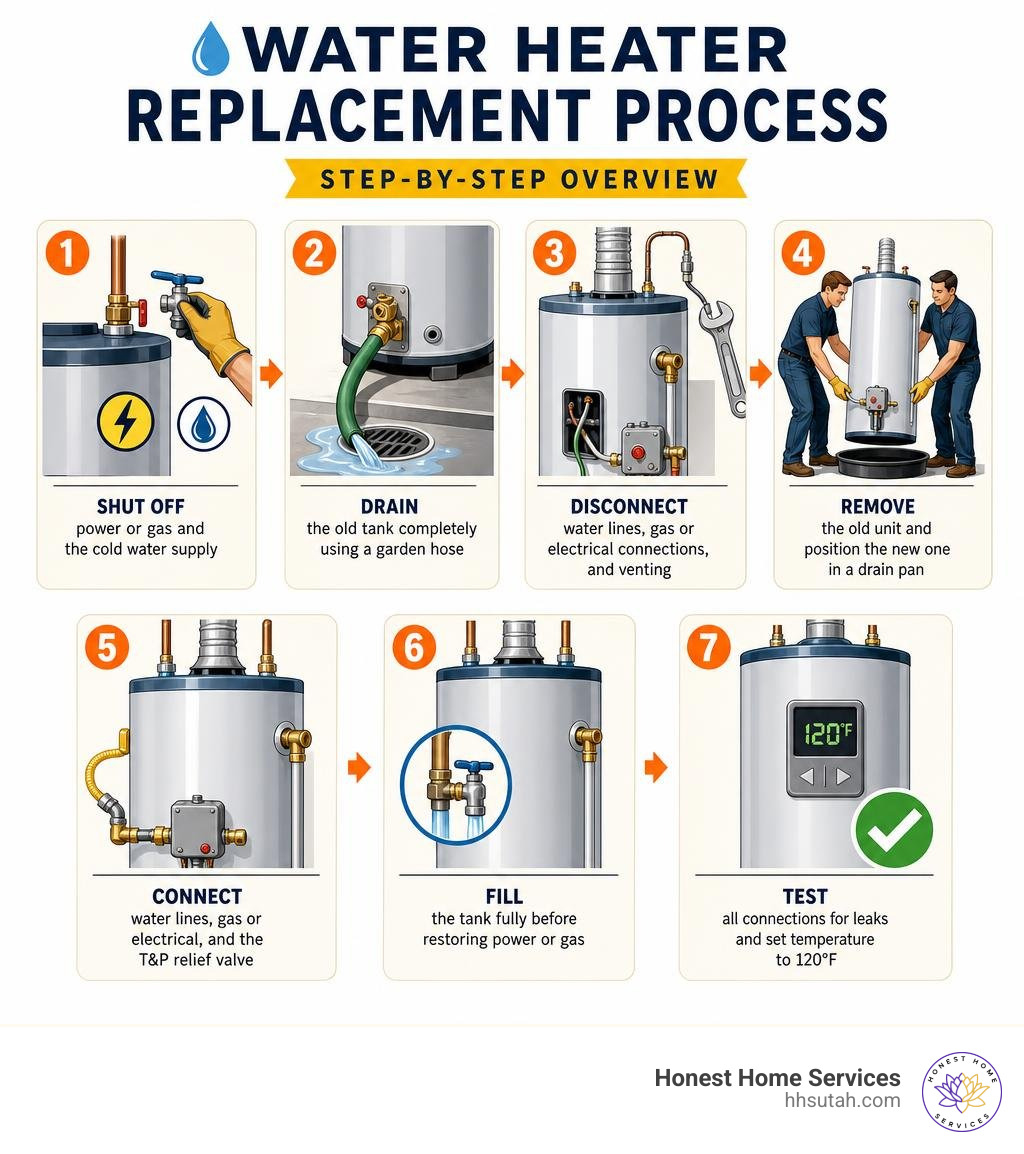
How to change out a water heater — quick answer:
- Shut off power or gas and the cold water supply
- Drain the old tank completely using a garden hose
- Disconnect water lines, gas or electrical connections, and venting
- Remove the old unit and position the new one in a drain pan
- Connect water lines, gas or electrical, and the T&P relief valve
- Fill the tank fully before restoring power or gas
- Test all connections for leaks and set temperature to 120°F
Deciding to change out your water heater is rarely something homeowners plan months in advance. As master plumber Richard Trethewey of This Old House has noted, most people only make this decision the moment their unit starts leaking — and suddenly they have about 24 hours to figure it out.
That’s a stressful place to be. You’re dealing with a heavy appliance, water, and either gas or electricity. The stakes feel high because they are high.
But here’s the good news: this is a manageable DIY project for most homeowners — especially if you’re replacing a like-for-like electric unit. Gas heaters require extra caution but are also doable if you follow each step carefully.
Before you grab a wrench, it helps to understand what you’re getting into:
- Most tank-style water heaters last 8 to 12 years
- A full replacement typically takes 4 to 6 hours for a DIYer
- DIY costs range from $600 to $1,800, vs. $1,200 to $3,000+ for professional installation
- Many jurisdictions require a permit even for a straight swap
This guide walks you through every step — from planning and safety to installation and final testing.
At Honest Home Services, we’ve spent over 20 years helping Northern Utah homeowners change out water heaters of every type and size, and we’ve seen every mistake worth avoiding. Whether you tackle this yourself or decide you’d rather have a pro handle it, this guide gives you everything you need to make the right call.
Easy change out water heater glossary:
Planning to Change Out Your Water Heater: What to Know Before You Start

Before you rush to the local home improvement store in Salt Lake City or Layton to buy a replacement tank, you need to lay some groundwork. A successful DIY installation relies heavily on proper preparation. This isn’t just about choosing a tank that fits in your closet; it is about local code compliance, safety, and understanding your home’s infrastructure.
First, check your home’s water pressure. Residential water pressure should ideally sit between 50 and 60 PSI. If your home’s pressure exceeds 80 PSI, code requires you to install a pressure-reducing valve. High water pressure acts like a slow-motion hammer on your plumbing system, wearing down joints and significantly shortening the lifespan of your new tank.
Second, determine if you need a thermal expansion tank. In a closed plumbing system—which is common across Davis County and Salt Lake County due to backflow preventers installed by municipal water departments—water expands when heated. Because it has nowhere to go, this expansion creates intense pressure spikes. A thermal expansion tank (typically a small 2-gallon tank for systems up to 50 gallons) absorbs this excess volume, protecting your system.
There are many Advantages of Water Heater Replacement, including lower energy bills, a more reliable hot water supply, and peace of mind. To help you decide on the right technology for your home, review the comparison below.
| Feature | Gas Water Heater | Electric Water Heater |
|---|---|---|
| Upfront Cost | Moderate to High ($800+ for power-vent) | Lower ($400 – $800) |
| Operating Cost | Generally lower (depending on natural gas rates) | Typically higher (unless using a hybrid heat pump) |
| Recovery Rate | Fast (heats water quickly) | Slower recovery times |
| Complexity | High (involves gas lines, venting, and combustion) | Moderate (requires 240V dedicated electrical work) |
| Lifespan | 8 to 12 years | 10 to 15 years |
Gas vs. Electric Water Heaters
Understanding how your current unit operates is crucial before you attempt to change out your water heater. Gas units rely on a burner chamber at the bottom of the tank, which vents combustion gases safely out of your home. Electric units use upper and lower heating elements immersed directly in the water.
When working with electric units, your primary hazard is the 240-volt electrical circuit. You must use a non-contact voltage tester to verify the power is completely off before touching any wires. For gas models, the main concern is preventing gas leaks and ensuring proper exhaust venting. You will need to locate your dedicated gas shutoff valve and handle the connections with extreme care. To get a broader understanding of the overall process and structural considerations, check out Everything You Need to Know to Replace a Water Heater.
Essential Tools, Materials, and Permits
Do not start this project on a Sunday afternoon only to realize you are missing a critical fitting. Here is a checklist of what you will need:
- Tools: Pipe wrenches (two 16-to-18-inch wrenches are ideal), channel lock pliers, a non-contact voltage tester, a tubing cutter, a garden hose, a level, and a screwdriver.
- Materials: Teflon tape (applied clockwise), pipe joint compound (pipe dope), flexible water supply connectors, a new T&P relief valve, and a drain pan.
- Permits: Yes, you almost certainly need one. Most cities in Northern Utah, from Bountiful to Clearfield, require a plumbing permit to replace a water heater. This ensures a local inspector verifies your venting, gas connections, and seismic strapping are safe and up to code.
For a deeper dive into modern tank features and sizing, read Everything You Need to Know About New Water Heaters.
Step-by-Step Guide to Removing the Old Water Heater
Now that you have your tools assembled and your permit secured, it is time to remove the old unit. Safety is your absolute priority during this phase.
Step 1: Shut Off Power, Gas, and Water
If you have an electric water heater, locate your home’s main electrical panel and switch off the dedicated double-pole circuit breaker (usually 30 or 40 amps). Use your voltage tester on the wires at the top of the water heater to verify that no electrical current is active.
For gas units, turn the gas control valve on the front of the heater to the “OFF” position, then close the manual gas shutoff valve on the incoming gas line.
Finally, turn off the cold water supply. This can be done at the dedicated shutoff valve directly above the water heater. If that valve is stuck, rusted, or leaking, you must shut off your home’s main water valve. For more details on managing emergency leaks during this phase, see Why Your Gas Water Heater Is Leaking and How to Stop the Flood.
Step 2: Drain the Tank Safely
A tank filled with water is incredibly heavy (water weighs roughly 8.3 pounds per gallon, meaning a full 50-gallon tank weighs over 400 pounds). You must drain it completely.
- Attach a standard garden hose to the drain valve at the bottom of the heater. Route the other end of the hose to a floor drain, a utility sink, or outside.
- Open a hot water faucet upstairs or open the water heater’s Temperature and Pressure (T&P) relief valve to break the vacuum inside the tank. This allows the water to flow freely.
- Open the drain valve.
If your tank is older, sediment buildup may clog the drain valve, causing only a slow trickle to escape. If this occurs, briefly open the cold water supply valve to let a blast of incoming pressure break up the sediment block, then close it and continue draining. Understanding this Common Water Heater Problem can save you hours of waiting.
Step 3: Disconnect and Remove the Old Unit to Change Out Your Water Heater
Once the tank is completely empty, you can safely disconnect the lines.
- Water Lines: Use your pipe wrenches or tubing cutters to disconnect the hot and cold water lines. If your home has old copper piping, you may need to cut the lines. We recommend cutting them slightly higher than the existing connections to give yourself plenty of flexibility when fitting the new unit.
- Gas/Electric: For gas units, disconnect the gas line at the union. Be sure to use two wrenches—one to hold the control valve steady and one to turn the fitting—so you do not twist or damage the internal gas manifold. If your system uses a Corrugated Stainless Steel Tubing (CSST) gas line, handle it carefully. For electric units, unscrew the junction box cover on top of the heater, disconnect the wire nuts, and remove the electrical conduit.
- Venting (Gas Only): Disconnect the draft hood or vent pipe from the top of the unit.
With everything disconnected, carefully slide the old unit out of the way. Because old water heaters can be heavy with trapped sediment, use a heavy-duty appliance dolly and proper lifting techniques. For a detailed breakdown of this removal process, consult the Water Heater Replacement: A Complete Step-by-Step Guide for Homeowners – Plumbing Resource.
Installing and Connecting Your New Water Heater
With the old unit gone, take a moment to clean the floor. If your water heater is located in a basement, attic, or near finished living spaces, place a new, properly sized drain pan on the floor first. The pan should be at least two inches wider than the diameter of your new water heater.
Step 4: Position and Level the New Tank
Carefully set the new water heater into the drain pan. Use a level to ensure the unit stands perfectly vertical. If your floor is uneven, use plastic shims designed for heavy appliances to level the tank.
Because we live along the Wasatch Front, earthquake safety is a critical concern. Seismic strapping is mandatory in the Wasatch Fault zone (covering Salt Lake City, Sandy, Kaysville, and surrounding areas). You must install heavy-duty metal straps around the upper and lower thirds of the tank, anchoring them securely into the wall studs. This prevents the unit from tipping over during seismic activity, which could rupture gas or water lines.
Additionally, maintain proper clearance space around the unit. If you are installing a hybrid heat pump model, it typically requires a minimum of 450 cubic feet of unconfined space to draw in enough air to operate efficiently.
Step 5: Connect Water, Gas, or Electric Lines
Now, connect your utilities to the new unit.
- Water Supply: You can use flexible stainless steel or copper corrugated connectors to bridge the gap between your home’s plumbing and the new tank. Apply Teflon tape or pipe dope clockwise to the male threads of the tank nipples before attaching the connectors. If you choose to solder copper lines directly, do so away from the tank to avoid damaging the internal plastic heat traps inside the nipples. Alternatively, high-quality push-to-connect fittings can make this step quick and leak-free.
- Gas Connection: Reconnect the gas line using a yellow Teflon tape designed specifically for gas threads. Always use two wrenches to tighten the connections. Once connected, perform a gas leak test by brushing a mixture of dish soap and water onto all gas joints. If you see bubbles forming, shut off the gas immediately and tighten the connection.
- Electrical Connections: For electric units, pull the home’s electrical wiring through the strain relief clamp into the unit’s junction box. Connect the ground wire (green or bare copper) to the green grounding screw, and connect the two line wires (usually black and red/white) to the heater leads using wire nuts.
For safety and maintenance tips tailored specifically to gas appliances, see Don’t Get Left in the Cold: How to Service Your Gas Water Heater.
Step 6: Install the T&P Relief Valve and Discharge Pipe
The Temperature and Pressure (T&P) relief valve is your water heater’s primary safety device. It prevents the tank from over-pressurizing or overheating.
Install the T&P valve into the designated opening on the side or top of the tank using Teflon tape on the threads. Next, connect a discharge tube to the valve. This tube must be constructed of copper or CPVC (never use standard PVC, as it cannot handle high temperatures). The discharge tube must run downward and terminate no more than 6 inches above the floor drain or catch pan, ensuring that any high-pressure steam or scalding water is directed safely toward the floor.
Testing, Startup, and Post-Installation Checks
Before you turn on the gas or flip the electrical breaker back on, you must perform several quality and safety checks.
Filling the Tank and Checking for Leaks
Never turn on the power or gas to an empty water heater. Doing so will cause “dry firing,” which instantly destroys electric heating elements or damages a gas tank’s glass lining.
- Open a hot water faucet somewhere in your house (such as a bathtub).
- Slowly open the cold water supply valve to the water heater.
- Let the tank fill. You will hear air purging out of the open faucet. Once a steady stream of water flows from the faucet without sputtering, the tank is completely full.
- Carefully inspect every joint, connection, and valve for leaks. Use a dry paper towel to wipe around the fittings; even a tiny drop of moisture will show up clearly.
Restoring Power or Gas and Setting the Temperature
Once you are certain there are no leaks and the tank is full, restore power at the breaker panel or turn on the gas supply.
For gas units, follow the manufacturer’s instructions on the side of the tank to light the pilot light or start the electronic ignition.
Calibrate your thermostat. We strongly recommend setting the temperature to 120 degrees Fahrenheit. This is the ideal temperature for household use: it is hot enough to prevent bacteria growth inside the tank, yet cool enough to prevent accidental scalding (water at 140°F can cause serious burns in less than 5 seconds). Setting the temperature to 120°F also reduces standby energy loss, saving you money on your monthly utility bills.
When to Hire a Professional to Change Out Your Water Heater
While many handy homeowners can successfully change out a water heater, there are times when it is best to leave it to the professionals. You should consider hiring a licensed plumber if:
- You are converting from an electric system to a gas system (or vice versa).
- Your home has complex venting requirements, such as a power-vent system that must exit through a side wall.
- You live in an older home with deteriorated galvanized pipes that crumble when touched.
- You are upgrading to a tankless system, which requires extensive gas line resizing and specialized venting.
If you run into any of these situations, or if you simply do not feel comfortable handling 240V electricity or gas lines, professional help is always the safest option. For help deciding between repairing your old system or fully replacing it, read From Cold Showers to Comfort: Understanding Hot Water Heater Repair Replacement.
Frequently Asked Questions about Water Heater Replacement
Do I need a permit to change out my own water heater?
Yes. In almost every municipality across Northern Utah, including Salt Lake City, Layton, and Bountiful, local building codes require a plumbing permit for water heater replacement. Getting a permit and scheduling a safety inspection ensures your venting, gas connections, and double-strapped seismic brackets are installed safely and meet local codes.
How long does it take to replace a water heater?
For a professional plumbing team, a standard like-for-like water heater replacement typically takes between 2 and 4 hours. If you are tackling this as a DIY project for the first time, expect it to take between 4 and 6 hours. This accounts for the time needed to drain the old tank, make runs to the hardware store for fittings, and carefully check your work for leaks.
Why is my new water heater making popping or rumbling noises?
If your new water heater starts making popping or rumbling sounds after a few months, it is likely due to sediment buildup. Northern Utah has notoriously hard water (Salt Lake City water measures around 19 grains of hardness per gallon). This hard water drops mineral sediment to the bottom of the tank, where it traps water underneath. As the burner heats up, the trapped water boils and bubbles up through the sediment, creating a popping sound. Performing an annual tank flush will clear out this sediment and keep your unit running quietly.
Conclusion
Deciding to change out your water heater is a major home improvement project, but with the right tools, proper planning, and a commitment to safety, it is a task you can successfully accomplish on your own. By following local seismic codes, checking your water pressure, and taking your time during the installation, you can restore reliable hot water to your home and save money in the process.
However, if you run into unexpected plumbing issues, feel uneasy working with gas or high-voltage electrical lines, or simply want the peace of mind that comes with a certified installation, we are here to help. At Honest Home Services, our local, expert technicians provide honest, reliable, and affordable plumbing services across Northern Utah, backed by our 100% customer satisfaction guarantee and 24/7 emergency support.
Ready to get started or need a professional hand? Schedule professional water heater services with Honest Home Services today!