

When Your Hot Water Goes Cold: What to Know About Water Heater Pilot Assembly Replacement
Water heater pilot assembly replacement is the process of swapping out the small but critical cluster of parts — the pilot burner, thermocouple or thermopile, and igniter — that keeps your gas water heater running. If your pilot light keeps going out, or won’t stay lit at all, a failed pilot assembly is almost always the reason you’re getting cold showers.
Here’s a quick overview of what’s involved:
- Diagnose the problem — pilot won’t stay lit, no hot water, repeated outages
- Identify the correct replacement kit — match your water heater’s model number and fuel type (natural gas or propane)
- Gather tools — open-end wrenches, a T20 Torx driver, and a soap-and-water leak test solution
- Replace the assembly — disconnect gas lines, swap the pilot burner and thermocouple, replace the burner door gasket
- Test for leaks — apply soap solution to all connections and relight the pilot
- Know when to call a pro — if you smell gas, have a sealed burner chamber, or aren’t comfortable working with gas lines
Pilot assembly kits are widely available and generally cost $12 to $36 for DIY parts. A professional repair typically runs higher once labor is included — but it comes with peace of mind.
At Honest Home Services, we’ve been diagnosing and completing water heater pilot assembly replacement jobs across Northern Utah and Salt Lake City for over 20 years, from straightforward thermocouple swaps to complex FVIR sealed-chamber repairs. Keep reading for our complete, safety-first guide to getting your hot water back.
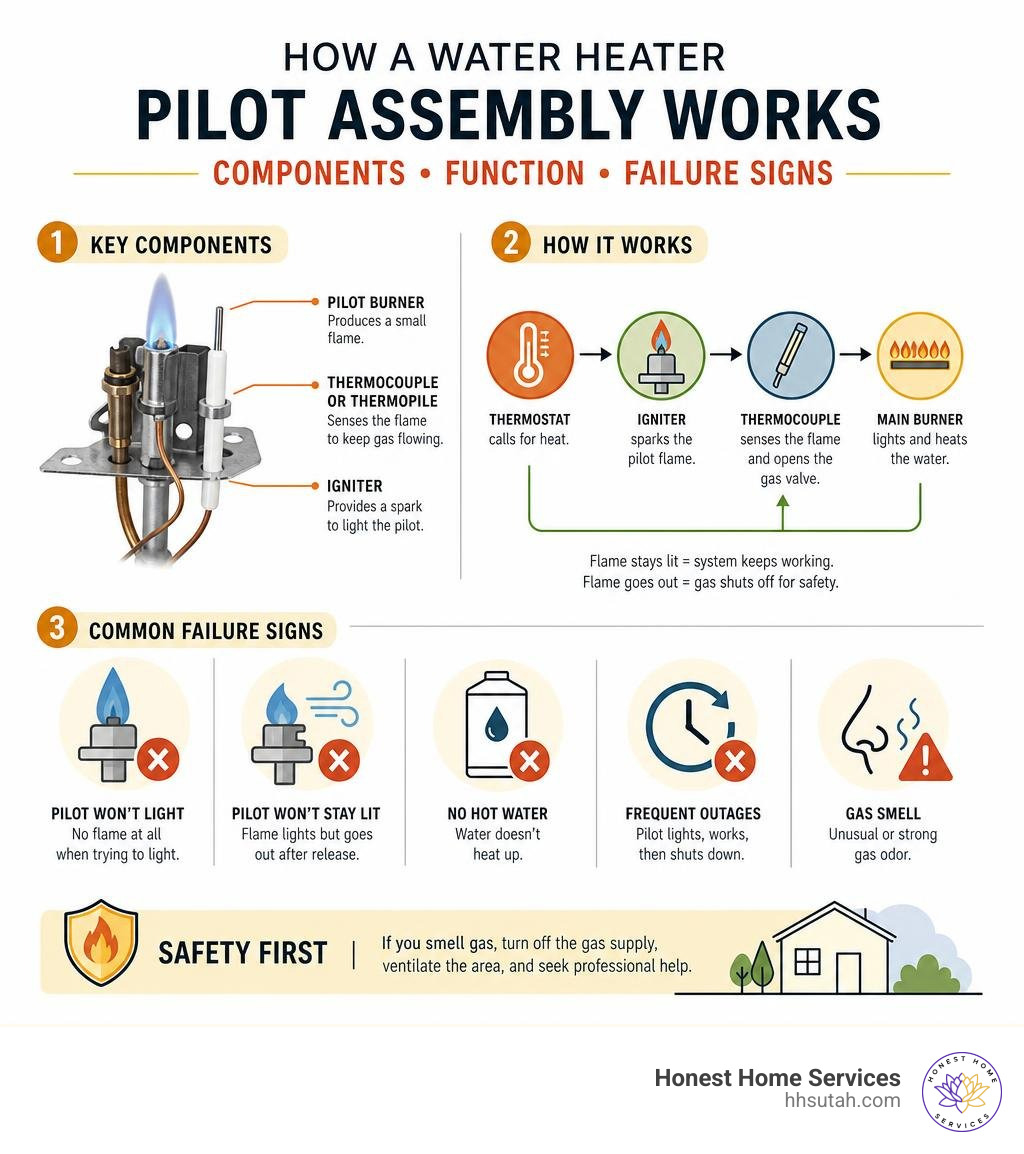
What is a Water Heater Pilot Assembly?
To understand why your water heater is refusing to heat your water, we first need to look at the heart of your gas water heater’s ignition system: the pilot assembly. The pilot assembly is a small, specialized bracket mounted directly next to the main burner inside your water heater’s combustion chamber. Its primary job is to safely light the main gas burner whenever the thermostat calls for heat.
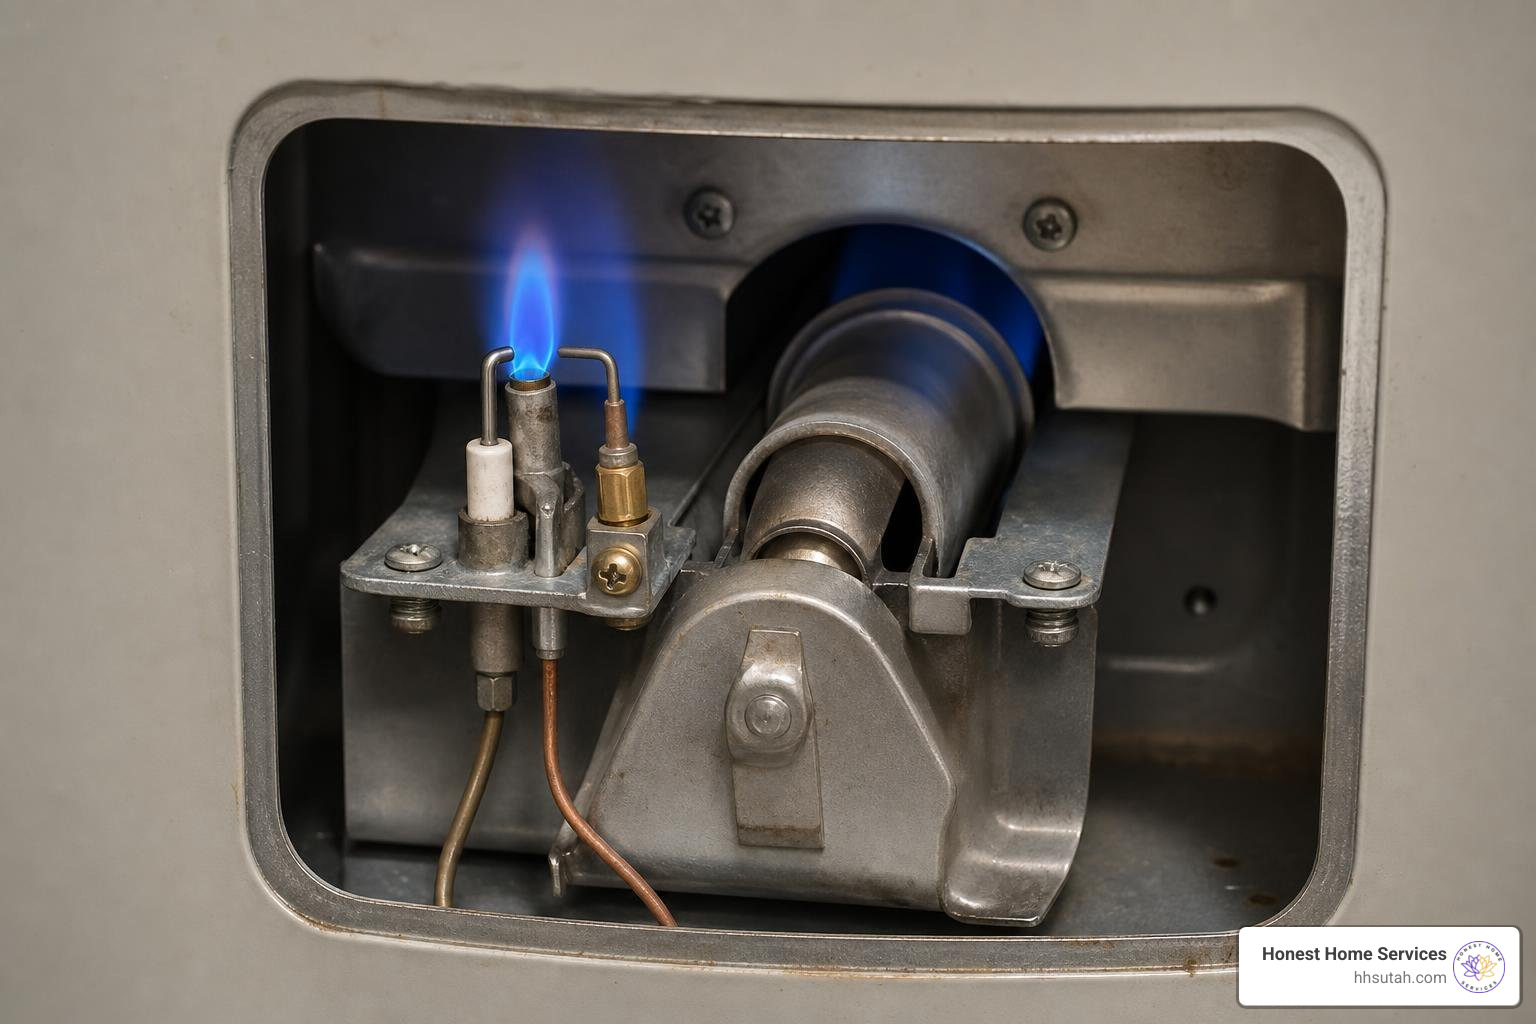
The assembly is made up of three main components working in perfect harmony:
- The Pilot Burner (or Pilot Tube): This is the small pipe that delivers a tiny, continuous stream of gas to feed the standing pilot flame.
- The Safety Sensor (Thermocouple or Thermopile): This is the ultimate gatekeeper of gas safety. It sits directly in the path of the pilot flame. When heated, it generates a tiny electrical current that signals the main gas control valve to stay open. If the flame goes out, the sensor cools down, the current stops, and the gas valve instantly snaps shut to prevent dangerous gas from leaking into your home.
- The Igniter (Piezo Spark Electrode): This is the push-button spark generator that allows you to light the pilot flame without having to stick a match inside the combustion chamber.
When one of these parts wears out, gets clogged with carbon deposits, or fails structurally, the entire system shuts down as a safety precaution. This is a common water heater problem and is usually why your water heater is giving you the cold shoulder. Understanding how these parts interact is the first step in diagnosing the top 7 gas water heater problems and how to solve them.
Thermocouple vs. Thermopile: What is the Difference?
While both devices serve as safety sensors that generate electrical current when heated, they operate on different scales and are used in different types of gas control valves.
A thermocouple is a single probe made of two dissimilar metals. When the tip is heated by the pilot flame, it generates a tiny electrical current of about 25 to 35 millivolts (mV). This small voltage is just enough to hold open a safety solenoid valve inside a standard gas control unit. Thermocouples are most commonly found in traditional, standard-efficiency water heaters with standing pilots. If your burner relies on a simple copper wire running back to the gas valve, you are likely looking at a thermocouple system. For a deep dive into this specific part, check out our fix your hot water the ultimate guide to thermocouple replacement.
A thermopile, on the other hand, is essentially a cluster of multiple thermocouples bound together in a single probe. Because it has multiple sensors combined, it generates a much stronger electrical current—typically between 500 and 750 millivolts (mV). This larger voltage doesn’t just hold open a safety valve; it actually produces enough electricity to power an electronic thermostat and a digital LED status screen on modern, smart gas valves (like the Honeywell or White-Rodgers Icon systems) without needing to be plugged into an electrical wall outlet.
How to Choose the Right Water Heater Pilot Assembly Replacement Kit
You cannot simply walk into a hardware store in Salt Lake City and grab the first pilot assembly you see on the shelf. Gas water heaters are highly calibrated appliances, and using the wrong replacement kit can lead to improper combustion, gas leaks, or a pilot flame that simply refuses to stay lit.
To find the perfect match, you need to gather three critical pieces of information from the white rating label located on the side of your water heater tank:
- The Manufacturer and Model Number: Brands like Rheem, Bradford White, A.O. Smith, and Kenmore use highly specific brackets and tube lengths. For example, a Rheem Ultra Low NOx unit might require a very specific PROTECH kit with high-temperature fiber gaskets, while a Kenmore unit might use a specific manifold block.
- The Fuel Type: This is non-negotiable. Natural Gas (NG) and Liquid Propane (LP) burn at different pressures and require different orifice sizes. Liquid Propane pilot assemblies have much smaller orifices because LP is delivered at a higher pressure. Never use a Natural Gas pilot assembly on a Propane water heater, or vice versa.
- The Ignition Style: Check whether your system uses a standard thermocouple, a high-voltage thermopile, or a modern electronic ignition system (IID) that doesn’t use a standing pilot at all.
While universal pilot kits exist and can work in a pinch for older standard units, we always recommend sourcing genuine OEM (Original Equipment Manufacturer) parts. OEM parts are guaranteed to fit your exact burner door and maintain the strict safety seals required by modern Flammable Vapor Ignition Resistant (FVIR) standards. For more context on choosing parts, you can read this guide on Water Heater Thermocouple Replacement: DIY Steps to Fix Your Pilot Light – Water System Wiki .
Step-by-Step Guide to Water Heater Pilot Assembly Replacement
Replacing your pilot assembly is a highly technical task that requires working directly with gas lines and combustion chambers. If you are comfortable with basic hand tools and strictly follow safety protocols, it is a manageable DIY project.

Tools and Materials Needed:
- Open-end wrenches (sizes 3/8-inch, 7/16-inch, and 3/4-inch)
- Screwdrivers (flat-head and Phillips)
- #20 Torx head screwdriver (for tamper-resistant burner doors)
- A fine wire brush
- A headlamp or flashlight (to keep your hands free)
- A new OEM pilot assembly replacement kit (including a new burner door gasket)
- A 50/50 mixture of liquid dish soap and water in a spray bottle (or a commercial gas leak detection solution)
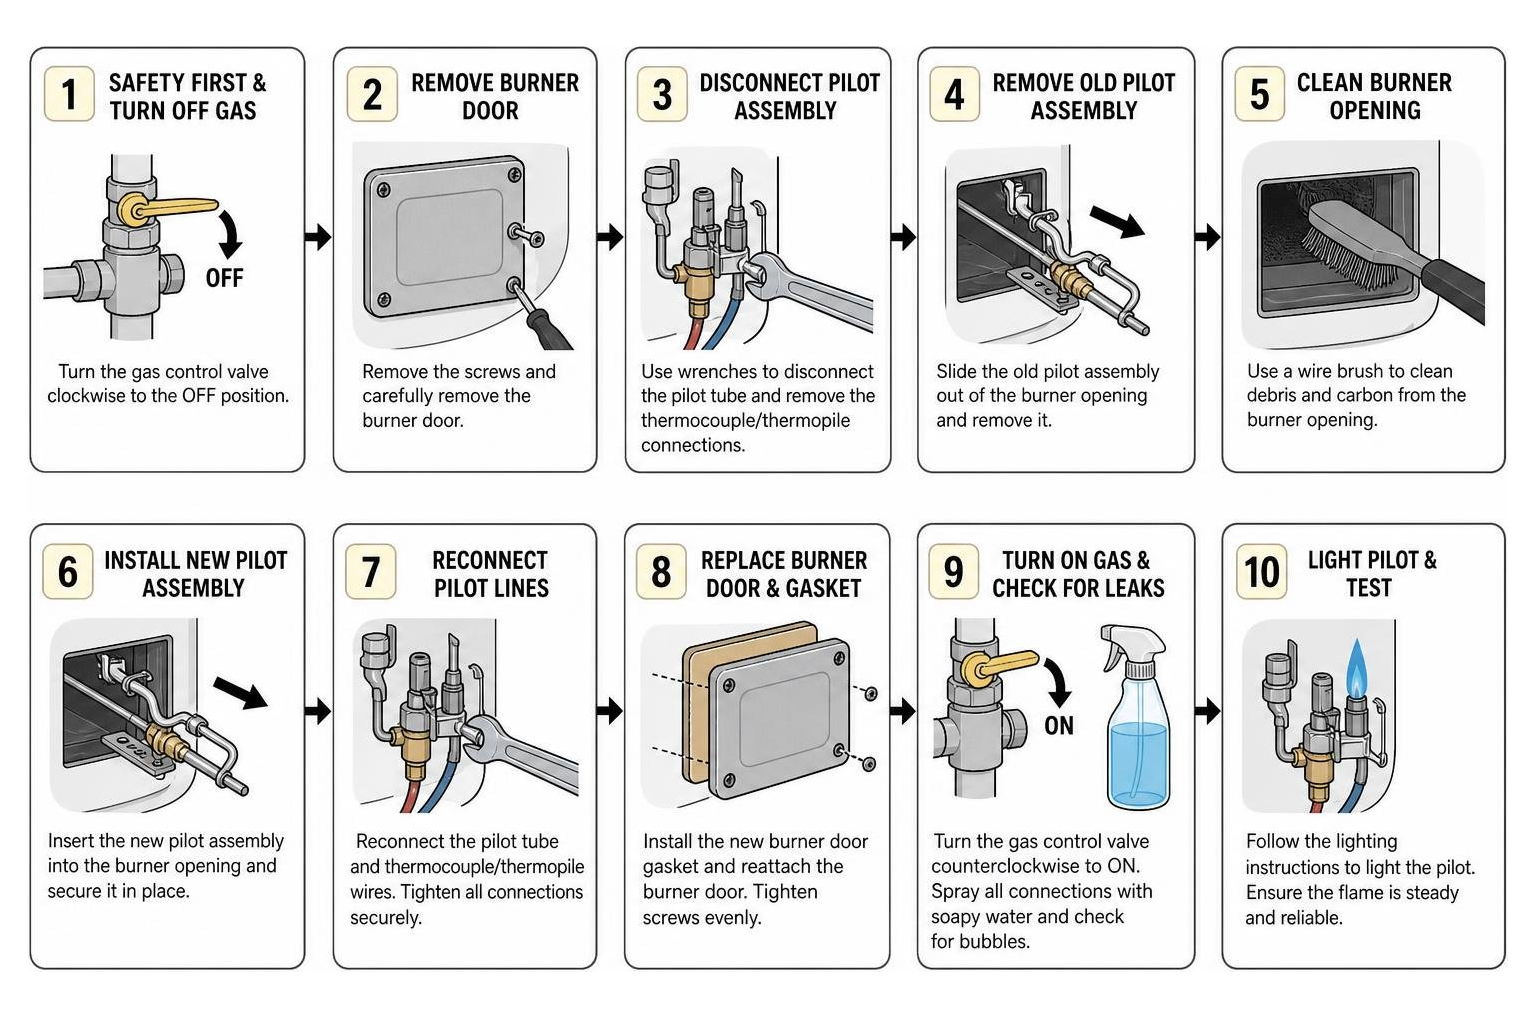
Step 1: Safety First and Disconnecting the Gas Lines
Before you pick up a wrench, you must make the workspace completely safe. Gas is highly volatile, and a single spark can cause a disaster.
- Shut off the gas supply: Locate the manual gas shut-off valve on the black iron pipe leading to your water heater. Turn the handle one-quarter turn so that it is perpendicular (at a right angle) to the pipe.
- Turn off the control valve: Turn the dial on the front of your water heater’s gas control valve to the “OFF” position.
- Wait for gas to dissipate: Wait at least 5 to 10 minutes to allow any lingering gas in the lines or combustion chamber to completely clear out. If you smell gas after 10 minutes, immediately leave the house and call your gas utility provider.
- Disconnect the lines: Once the air is clear, use your open-end wrenches to disconnect the three lines attached to the bottom of the gas control valve:
- The large burner supply tube (typically uses a 3/4-inch wrench). Note: If you have an LP system, this nut may have left-handed threads, meaning you must turn it clockwise to loosen it.
- The thin copper pilot supply line (typically uses a 7/16-inch wrench).
- The copper thermocouple or thermopile wire (typically hand-tightened or uses a small wrench).
- Unplug the thin piezo igniter wire from the spark button.
For detailed technical references on these connections, you can consult the INSTALLATION INSTRUCTIONS (White-Rodger’s Pilot Assembly Replacement Kit) .
Step 2: Removing the Burner Assembly and Installing the New Parts
Modern water heaters utilize a sealed combustion chamber to prevent external flammable vapors from igniting. Accessing the burner requires removing the burner door carefully.
- Remove the outer jacket door: Slide or unclip the outer metal door at the base of the water heater to expose the inner burner access door.
- Unscrew the burner door: Use your #20 Torx driver (or screwdriver, depending on your model) to remove the screws securing the inner burner access door to the tank.
- Carefully slide out the burner assembly: Gently lift and pull the entire burner assembly, including the main burner grate, pilot tube, and thermocouple, out of the combustion chamber. Be careful not to scrape the delicate ceramic parts or bend the tubes as you slide it out.
- Remove the old pilot assembly: Unscrew the old pilot bracket from the main burner assembly. Pull the old tubes and wires out through the rubber grommet in the burner door.
- Mount the new assembly: Attach the new pilot assembly to the burner bracket.
- Route the wires: Carefully thread the new pilot tube, thermocouple/thermopile wire, and igniter wire back through the opening in the burner door. Ensure the orange rubber grommet is fully seated in the door hole to maintain an airtight seal.
- Shape the pilot tube: If your replacement kit shipped with a straight pilot line, use your old pilot tube as a physical bending template. Carefully shape the new copper line to match the curve of the old one, making sure not to crimp or crease the tube, as this will restrict gas flow. Keep any bends at least one inch away from the thermocouple weld joint.
For a step-by-step physical walkthrough of this process on popular models, refer to the manual for Replacing the Pilot/ Pilot Tube Assembly | Kenmore 153.339572 .
Step 3: Replacing Gaskets and Reconnecting the Lines
This is the step where many DIYers make a critical mistake. Because the burner chamber is a sealed environment, you must replace the burner door gasket every single time the door is removed. Reusing an old, compressed, or torn fiberglass gasket can allow dangerous carbon monoxide to escape into your home.
- Clean the metal surfaces: Use a putty knife or a fine wire brush to thoroughly scrape away any old gasket adhesive and debris from both the burner door and the combustion chamber frame. Clean the surfaces with mild soap and water (never use flammable solvents like gasoline or paint thinner).
- Apply the new high-temperature gasket: Align the new fiberglass or fiber gasket included in your kit onto the inner door, ensuring all screw holes align perfectly.
- Reinstall the burner assembly: Slide the burner assembly back into the combustion chamber. Secure the burner door using the screws. Tighten them by hand first, then snug them up with your Torx tool to no more than 15 inch-pounds of torque. Never use power tools, as they can easily warp the door and ruin the airtight seal.
- Reconnect the lines to the gas valve:
- Hand-thread the burner supply tube and pilot supply tube into the gas valve to prevent cross-threading. Once threaded, tighten them with a wrench until snug (about 1/4 to 1/2 turn past hand-tight).
- Insert the thermocouple/thermopile line straight into the valve. Thread it by hand and tighten it gently with a wrench—over-tightening will damage the delicate copper threads and ruin the connection.
- Plug the piezo igniter wire back into the spark generator.
For detailed diagrams on maintaining the sealed integrity of FVIR chambers during this step, see the INSTALLATION INSTRUCTIONS (FVIR) Pilot Assembly Replacement Kit .
Step 4: Testing for Gas Leaks and Relighting the Pilot
Never skip this step. Even a tiny, microscopic gas leak can build up over time and pose a massive safety risk.
- Turn the gas back on: Open the manual gas shut-off valve (handle parallel to the pipe).
- Apply the leak test solution: Spray your 50/50 dish soap and water solution directly onto all the threaded connections at the base of the gas control valve (especially the pilot tube and main burner tube connections).
- Watch for bubbles: Look closely for several minutes. If you see growing, expanding soap bubbles, you have a gas leak. Shut off the gas immediately, tighten the leaking fitting slightly, and test again.
- Relight the pilot: Once you are 100% sure there are no leaks, turn the gas control knob to the “PILOT” position. Press and hold the knob down while repeatedly clicking the piezo igniter button until you see a flame spark to life through the sight glass.
- Hold the knob: Continue holding the gas control knob down for a full 60 seconds to allow the new thermocouple to heat up and generate enough millivolts to open the safety valve. Release the knob; the pilot flame should remain lit.
- Turn the thermostat on: Turn the gas control knob to the “ON” position and set your desired temperature (we recommend a safe, scalding-preventative starting temperature of 120°F). The main burner should ignite with a clean, steady flame.
For more tips on keeping your system running smoothly after this repair, review the essential gas water heater maintenance checklist.
Cost Breakdown: DIY vs. Professional Replacement
Is replacing a pilot assembly a project you should tackle yourself, or should you leave it to the professionals? Let’s break down the real-world costs of both options so you can make an informed decision.
| Cost Factor | DIY Replacement | Professional Replacement (Honest Home Services) |
|---|---|---|
| Parts Cost | $12 – $36 (Standard/Universal) $30 – $120 (OEM/FVIR Kits) |
Included in service quote (We supply genuine OEM parts) |
| Tools Needed | $15 – $40 (If you don’t own wrenches/Torx drivers) | Included (We bring commercial-grade diagnostic tools) |
| Labor Cost | $0 (Your own weekend time) | $150 – $300 (Depending on complexity and location) |
| Permit Fees | Varies (Some local UT municipalities require permits) | Handled by us if required by local codes |
| Warranty | 1-year limited parts warranty (Retailer dependent) | Parts warranty + 100% Satisfaction Guarantee |
| Safety Risk | High (Potential for gas leaks, carbon monoxide, or fire) | Zero (Certified, licensed, and insured technicians) |
| Time Investment | 2 – 4 hours (Including shopping and research) | 45 – 60 minutes (Fast, efficient, and hassle-free) |
While taking the DIY route can save you money upfront, working with gas lines carries inherent risks. If a gasket isn’t sealed perfectly, or a fitting is cross-threaded, you could face hazardous gas leaks or system failure. If you’re weighing the financial side, read our guide on how much will your broken water heater cost to fix and check out specific local pricing in our overview of hot water heater salt lake city costs repairs and recommendations.
Post-Installation Troubleshooting and Maintenance
Once your new pilot assembly is installed and your hot water is flowing, establishing good maintenance habits will ensure you don’t have to repeat this repair anytime soon.
- Perform an annual water heater flush: Over time, sediment builds up at the bottom of your tank, creating a barrier that forces the burner to work harder. Flushing your tank once a year keeps the combustion chamber clean and prevents soot from coating your new pilot assembly.
- Conduct an annual flame inspection: Peer through the sight glass once a year while the burner is running. A healthy pilot flame should be sharp, steady, and mostly blue in color. It should fully envelop the top 3/8-inch to 1/2-inch of your thermocouple or thermopile tip. If the flame is lazy, yellow, or flickering, it’s a sign of poor combustion or a draft issue.
Troubleshooting Your Water Heater Pilot Assembly Replacement
What happens if you’ve followed every step perfectly, but your pilot light still won’t stay lit? Don’t panic. Here is how to systematically troubleshoot the most common post-installation issues:
- The Pilot Lights, but Dies Instantly When You Release the Knob:
- Loose Thermocouple Connection: Check the copper wire where it screws into the gas valve. If it’s even slightly loose, the electrical current won’t reach the valve. Give it a gentle snug with a wrench (do not overtighten).
- Improper Flame Alignment: Ensure the thermocouple tip is sitting directly in the blue path of the pilot flame. If the bracket is bent and the flame is missing the sensor, it won’t generate heat.
- No Pilot Flame at All, Even with a Spark:
- Air in the Gas Line: If you disconnected the gas lines, there is likely air trapped inside. You may need to hold down the gas control knob in the “PILOT” position for several minutes to bleed the air out before gas finally reaches the pilot burner.
- Clogged Pilot Orifice: Even brand-new kits can sometimes collect tiny bits of debris during installation. If the orifice is clogged, use a thin piece of wire or compressed air to clear it.
- Perform a Multimeter Test:
- If you want to know for sure if your new safety sensor is working, you can test its millivolt output with a standard multimeter. Set your meter to DC millivolts, place one probe on the copper lead and the other on the brass fitting, and light the pilot. A healthy thermocouple should read between 25 and 35 mV. If the reading is below 20 mV, the sensor is defective and needs to be replaced.
For official manufacturer troubleshooting steps, you can refer to the INSTALLATION INSTRUCTIONS (Honeywell Pilot Assembly Replacement Kit) .
When to Call a Professional for Gas Line Repairs
While replacing a thermocouple is a great project for a handy homeowner, there are several scenarios where you should put down the wrench and call in a licensed professional:
- You smell gas: If you smell a rotten-egg odor near your water heater, do not attempt to fix it yourself. Shut off the main gas valve immediately, leave the house, and call a professional.
- You have a closed, sealed burner chamber: Many modern high-efficiency and Ultra Low NOx water heaters feature complex, completely sealed combustion chambers. Accessing these burners requires specialized gaskets, torque wrenches, and safety tests that are difficult to perform without professional training.
- Local building codes require it: In many parts of Salt Lake County and Davis County, local building codes legally require a licensed plumber or HVAC technician to perform any work involving gas lines. Attempting a DIY repair could void your manufacturer’s warranty or complicate future home inspections.
If you find yourself in over your head, don’t worry—we’ve got you covered. Read our guide on handling water heater repairs who to call for the job to see how a professional team can help.
Frequently Asked Questions about Pilot Assemblies
Why does my water heater pilot light keep going out?
The most common culprit is a failing thermocouple or thermopile that is no longer generating enough electrical current to hold the gas valve open. Other common causes include a clogged pilot orifice, a drafty room blowing out the flame, or a failing gas control valve itself.
Can I use a universal pilot assembly on any water heater?
Generally, no. While a universal thermocouple can fit many older, standard water heaters, modern FVIR (Flammable Vapor Ignition Resistant) systems require highly specific OEM pilot assemblies. Using a universal part can compromise the airtight seal of your burner chamber or lead to improper combustion. Always match your replacement kit to your water heater’s specific model number and fuel type (Natural Gas vs. Liquid Propane).
How long does a water heater pilot assembly last?
A typical water heater pilot assembly lasts between 5 and 8 years. Because it is constantly exposed to high heat and combustion byproducts, the thermocouple or thermopile will naturally degrade over time due to wear and tear. Regular maintenance, such as cleaning the pilot orifice and keeping the combustion chamber free of dust, can help extend its lifespan.
Conclusion
A cold shower is a quick way to ruin your morning, but a failing pilot assembly doesn’t mean you need to invest in a brand-new water heater. With the right tools, a matching OEM replacement kit, and a strict commitment to safety, replacing your pilot assembly is a highly effective way to restore your hot water and save on costly replacement bills.
However, working with gas appliances carries real safety risks. If you aren’t comfortable disconnecting gas lines, scraping delicate gaskets, or testing for leaks, the team at Honest Home Services is here to help. We provide fast, reliable, and affordable gas water heater repairs across Northern Utah—including Salt Lake City, Layton, Kaysville, Farmington, Bountiful, and West Valley.
Don’t risk your home’s safety or spend your weekend shivering through cold showers. Contact us today for expert, guaranteed salt lake city water heater repair and let our local technicians restore comfort to your home!