
What to Do When You Have a Cast Iron Pipe Leaking in Basement
A cast iron pipe leaking in basement is a serious problem — but it doesn’t always mean tearing up your entire floor. Here’s a quick summary of your options:
Quick fixes based on your situation:
| Situation | Best First Step |
|---|---|
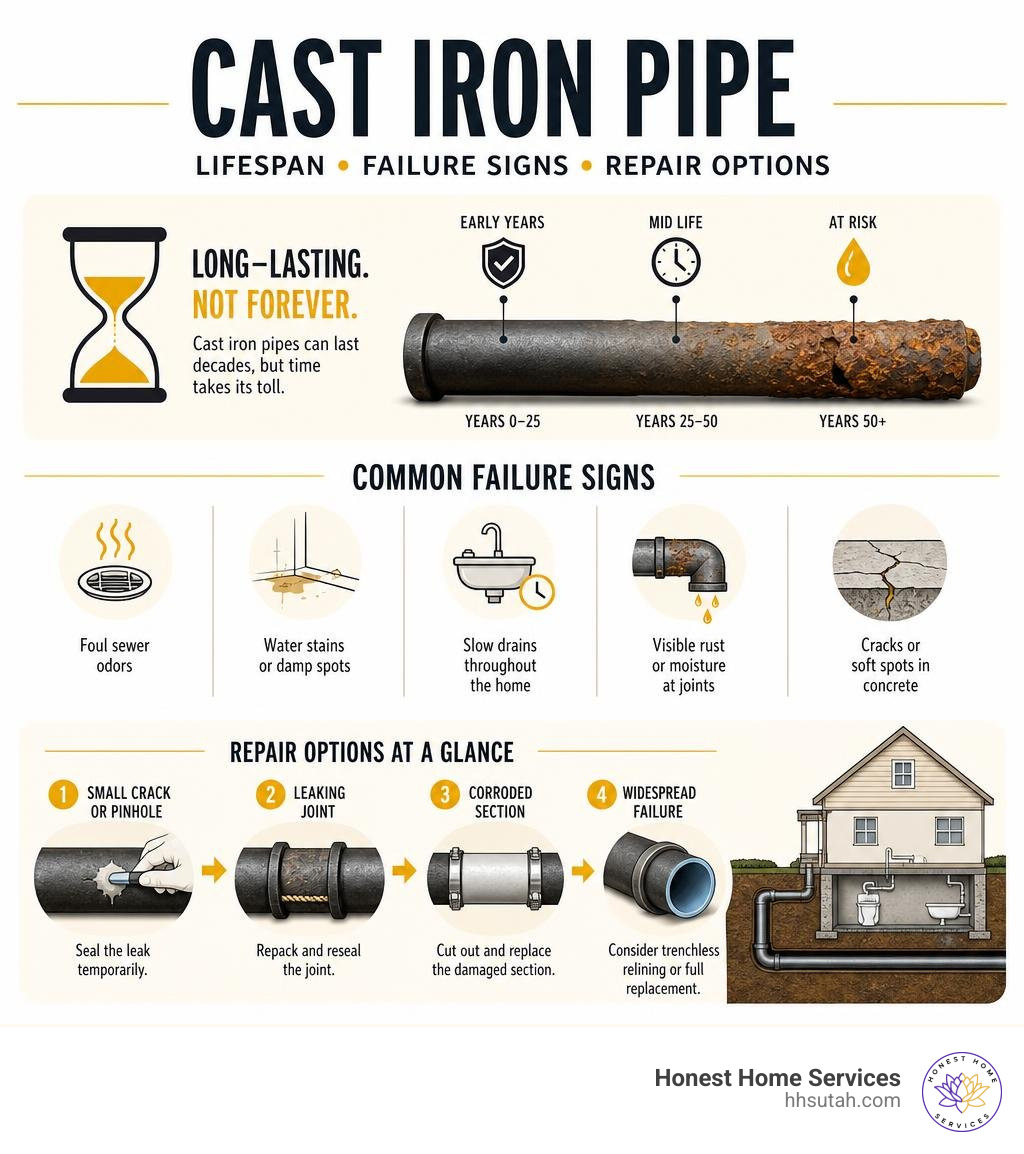
| Small crack or pinhole | Apply epoxy putty or JB Weld WaterWeld temporarily |
| Leaking joint | Repack oakum and reseal with cold caulking compound |
| Corroded section | Cut out and replace with PVC using a no-hub coupling |
| Widespread pipe failure | Call a professional for trenchless relining or full replacement |
Homes built before the late 1970s almost always have cast iron sewer lines running under the basement floor. These pipes can last 80–100 years, but many start failing after 50–75 years — right around the age of a lot of Northern Utah homes today.
When they go, the signs aren’t subtle. You might notice foul sewer odors, water stains on the floor, slow drains throughout the house, or visible rust and moisture around pipe joints. Left alone, a small leak can damage your foundation, create mold, and turn into a much bigger repair bill.
The good news? Not every leak means a full excavation. Many basement cast iron leaks can be stopped — temporarily or permanently — with the right approach.
At Honest Home Services, we’ve spent over 20 years diagnosing and repairing cast iron pipe leaks in basements across Utah, and we know exactly when a patch will hold and when it’s time for something more permanent. Whether you’re dealing with a dripping joint or a corroded section under your slab, we’ll walk you through every option clearly — so you can make the right call for your home and your budget.
Identifying a Cast Iron Pipe Leaking in Basement
Before you can fix a leaking pipe, you have to find it and understand exactly what is failing. In a basement, cast iron pipes are either exposed (running along walls or ceilings) or buried beneath the concrete slab.
If your pipe is buried, identifying a leak requires looking for indirect clues. Common signs of a subsurface cast iron leak include:
- Foul Sewer Gas Odors: A persistent, musty, or sulfur-like smell in your basement is a classic indicator that raw sewage or sewer gas is escaping from a cracked line.
- Slow Drains and Gurgling: If multiple fixtures in your home drain slowly or make gurgling sounds, there may be internal corrosion or a partial collapse in the main cast iron line.
- Water Stains and Damp concrete: Unexplained wet spots, damp concrete, or white powdery mineral deposits (efflorescence) on your basement floor often point to water escaping under the slab.
- Foundation Cracks: Over time, leaking water can wash away the supporting soil beneath your concrete slab, leading to localized settling and structural cracking.
For exposed pipes, you might spot physical droplets or wetness. However, not every droplet on a cast iron pipe is a water leak.
Historically, cast iron pipes were joined using a “bell-and-spigot” system sealed with packed jute rope (oakum) and molten lead. Over several decades, the organic oils used to treat the jute packing can seep out of the joint. This oil often appears as a sticky, dark, or amber-colored droplet that does not evaporate.
If you notice a dark, oily droplet but no active water or sewer smell, it might simply be jute oil seepage. However, if the droplet is watery, or if you notice “knots” or rust bubbles forming along the pipe length, these are signs that the pipe is rusting from the inside out and developing pinhole leaks. For a deeper look into identifying these hidden issues, check out our guide on The Secret Life of Leaks: Expert Drain and Pipe Leak Detection. You can also read this Expert diagnosis on cast iron joint seepage to help distinguish between harmless oil and an active leak.

Temporary Fixes for a Leaking Cast Iron Pipe
If you have discovered an active leak but are not ready for a major plumbing overhaul, a temporary DIY patch can buy you some time. However, it is important to understand the limits of these quick fixes.
Cast iron is highly textured and prone to continuous scaling. Temporary patches like epoxy putty, JB Weld WaterWeld, and rubber wrap-around patches only adhere well if the pipe surface is meticulously cleaned. Even then, they are short-term solutions. Many homeowners report that temporary epoxy patches begin to peel or fail within a few months as the pipe continues to corrode from the inside out. In fact, DIY forum logs show that homeowners who rely repeatedly on temporary patches eventually end up having to replace 25-to-32-foot sections of pipe anyway once the structural integrity of the line completely degrades.
Common temporary materials include:
- Epoxy Putty / JB Weld WaterWeld: This is a hand-kneaded, specialty compound that cures into a hard, waterproof seal. It is excellent for sealing small pinholes or narrow hairline cracks on horizontal or vertical runs.
- Rubber Couplings (Fernco) Used as a Wrap: For small cracks in the middle of a straight pipe, some DIYers cut a rubber sleeve, wrap it over the crack, and secure it tightly with stainless steel hose clamps.
While these fixes can stop a dripping pipe over the weekend, they should not be trusted as long-term repairs for sanitary sewer lines. For a comprehensive overview of temporary and permanent patching methods, read our Patch It Up: Your Complete Guide to Fixing Any Drain Pipe Leak and review this DIY forum discussion on temporary cast iron patches to see what has worked for other historic home owners.
How to Apply a Temporary Patch to a Cast Iron Pipe Leaking in Basement
If you need to apply a quick patch to stop a leak right now, follow these steps to ensure the best possible adhesion:
- Shut Off the Water: Ensure no one in the house runs water, flushes toilets, or uses appliances like the washing machine while you work. The pipe surface must be completely dry.
- Clean the Surface: Cast iron is often covered in rust, scale, and dirt. Use a stiff wire brush, sandpaper, or an angle grinder with a wire wheel to clean the area around the leak down to bare, shiny metal. Wipe away all dust with a dry cloth.
- Prepare the Epoxy: Cut off a slice of two-part epoxy putty (such as JB Weld WaterWeld). Knead it thoroughly with your fingers until the two colors merge into a single, uniform color.
- Apply the Putty: Press the putty firmly over the crack or pinhole. Feather the edges outward at least an inch beyond the damaged area to ensure a strong grip on the solid metal.
- Let It Cure: Do not run water through the system during the curing process. Allow the epoxy to harden completely—typically at least 6 hours—before restoring water use.
How to Safely Cut and Replace a Section of Cast Iron Pipe
When a temporary patch is no longer enough, the standard permanent solution is to cut out the failing section of cast iron and replace it with modern PVC or ABS plastic.
Because cast iron is incredibly heavy and brittle, this is a project that requires careful planning, proper support, and the right tools. If you cut a vertical stack or a long horizontal run without supporting it first, the weight of the remaining pipe can cause it to collapse, shattering the line and potentially causing severe injury or extensive property damage. Always install heavy-duty riser clamps or pipe hangers to support both sides of the section you plan to remove before making any cuts.
To learn more about the challenges of working with older plumbing materials, read our guide on Common Plumbing Problems in Older Homes and How to Fix Them. For a detailed, step-by-step look at managing repairs beneath a concrete floor, see this Step-by-step guide on repairing cast iron under a basement floor.

Cutting Tools and Safety Precautions
Cutting cast iron requires specialized tools. The three most common DIY and professional methods include:
- Snap Cutters (Chain Cutters): This is the cleanest and fastest tool for the job. You wrap a chain embedded with cutting wheels around the pipe and use a ratcheting handle to apply high pressure until the pipe “snaps” cleanly. This method produces almost no dust.
- Reciprocating Saw (Sawzall): If you use a Sawzall, standard metal-cutting blades will wear out in seconds. You must use a specialty carbide-tipped blade (which often cuts faster and cooler than diamond-grit blades in cast iron).
- Angle Grinder: An angle grinder fitted with a diamond cutting wheel can cut through cast iron, but it produces a massive amount of black, metallic dust and sparks.
Essential Safety Precautions:
- Always wear a P100 respirator to avoid inhaling toxic sewer dust, old lead particles, or rust.
- Wear heavy-duty leather gloves and impact-resistant safety glasses.
- Crucial Tip: Double-check that all occupants of the home know not to use any plumbing. There is nothing worse than cutting into an active sewer line mid-flush!
Transitioning from Cast Iron to PVC Without Cutting the Hub
If your leak is right next to a pipe joint (the “hub”), you may not need to cut the cast iron hub itself. Instead, you can transition directly from the existing cast iron hub to Sch 40 PVC using code-approved adapters.
To do this, the old lead and oakum joint must be carefully drilled or chiseled out to free the pipe end from the hub. Once the hub is cleaned of all old debris, you can insert a specialty rubber compression “donut” gasket. This gasket is designed to fit snugly inside the cast iron hub, allowing you to push a section of PVC pipe directly into the joint, creating a tight, reliable seal.
If you are joining two straight, cut ends of pipe (cast iron to PVC), you must use a shielded transition coupling (often referred to as a “no-hub” coupling). These couplings feature a thick rubber sleeve wrapped in a heavy-duty stainless steel shield with hose clamps. The metal shield is critical; it prevents the pipes from shifting or sagging over time. Using unshielded, all-rubber Fernco-style couplings on sanitary sewer lines is not code-compliant in many Utah jurisdictions because they lack the structural support to prevent offsets.
Trenchless Pipe Relining vs. Traditional Excavation
When a cast iron pipe leaking under a basement slab has failed in multiple areas, homeowners face a choice: dig up the basement floor or use modern trenchless technology.
Traditional excavation requires jackhammering the concrete floor, digging out the old pipe, laying new PVC, and pouring new concrete. This process is highly disruptive, dusty, and often requires homeowners to temporarily relocate due to inoperable plumbing.
Trenchless pipe relining, specifically CIPP (Cured-in-Place Pipe) lining, is a modern alternative. A flexible, epoxy-saturated fiberglass liner is pulled into the old cast iron pipe and inflated. Once the epoxy cures, it creates a seamless, incredibly strong “pipe-within-a-pipe.”
| Factor | Trenchless Relining (CIPP) | Traditional Excavation |
|---|---|---|
| Disruption | Minimal; completed through small clean-outs in 1–2 days | High; requires jackhammering, digging, and weeks of mess |
| Slab Damage | None | High; cuts through finished basement floors and walls |
| Lifespan | 50+ years | 75–100 years (for new PVC) |
| Average Cost | Higher upfront per-foot cost | Comparable or higher overall cost when factoring floor restoration |
While trenchless relining is the gold standard for preserving finished basements, it does have limitations. If the old cast iron pipe has completely collapsed, or if there is a severe offset where the pipe sections have shifted out of alignment, trenchless lining cannot be used. In those cases, traditional excavation is the only option. To understand the structural limits of cracked drainpipes, read this Expert analysis on cracked cast iron drainpipes.
Repairing a Joint vs. Replacing a Section of a Cast Iron Pipe Leaking in Basement
If you are dealing with a localized leak, how do you decide whether to repair the joint or cut out the section?
- When to Repair a Joint: If the pipe itself is thick, solid, and structurally sound, but water is seeping through a lead-and-oakum joint, you can often reseal it. Using a hammer and a caulking iron, you can gently tamp down the soft lead inside the hub to compress the oakum underneath and stop the leak. Alternatively, you can pack the joint with modern oakum and seal it using a cold caulking compound or plastic lead alternative, which cures without the safety hazards of melting hot lead.
- When to Replace a Section: If there are long, horizontal cracks along the bottom of the pipe, visible pinholes, or heavy interior scaling that causes constant clogs, the metal has reached the end of its lifespan. In these cases, a joint repair is useless, and the section must be cut out and replaced with PVC.
- When to Call a Professional: If the leaking pipe is buried beneath your concrete slab, is part of a load-bearing vertical stack, or if you suspect widespread structural failure, it is time to call in a licensed plumber. Attempting to DIY a major structural pipe replacement without the proper equipment can lead to costly structural damage.
Frequently Asked Questions about Cast Iron Pipe Leaks
How long do cast iron pipes last before leaking?
Cast iron pipes typically last between 80 and 100 years under ideal conditions, but many begin to corrode and fail after 50 to 75 years. In homes built before the late 1970s, these pipes are often nearing the end of their reliable service life. Factors such as soil acidity, high moisture levels, and the frequent use of harsh chemical drain cleaners can accelerate interior rust and lead to premature failure.
Can I use a standard rubber Fernco coupling on a sanitary sewer line?
In most jurisdictions across Northern Utah, using an unshielded, all-rubber Fernco coupling on a main sanitary sewer line is not compliant with local plumbing codes. Because these couplings lack a rigid metal sleeve, soil movement or pipe weight can cause the pipes to shift, creating an offset joint that catches debris and leads to severe clogs. Always use a code-approved, shielded transition coupling (no-hub band) to connect cast iron to PVC.
How do I prevent future cast iron pipe corrosion?
To extend the lifespan of your remaining cast iron plumbing:
- Avoid Chemical Drain Cleaners: Harsh, acid-based chemical cleaners eat away at the interior walls of cast iron pipes, rapidly accelerating corrosion.
- Use Hydro-Jetting with Caution: While professional drain cleaning is highly effective, older, fragile cast iron should be inspected with a sewer camera first to ensure it can withstand high-pressure water jetting.
- Monitor Moisture: Keep your basement dry and well-ventilated to prevent external rust from developing on exposed pipes.
- Regular Inspections: Schedule a professional video camera inspection every few years to catch minor scale buildup or tiny cracks before they turn into major leaks.
Conclusion
A cast iron pipe leaking in basement can feel like a overwhelming disaster, but with a systematic approach, you can resolve the issue safely and permanently. Whether you opt for a temporary epoxy patch to buy some time, cut out a corroded section yourself, or invest in modern trenchless relining, addressing the leak early is the key to protecting your home’s foundation and indoor air quality.
At Honest Home Services, we specialize in helping homeowners throughout Salt Lake City and the surrounding Northern Utah communities navigate complex pipe repairs with transparency and fair pricing. If you suspect your basement slab is hiding a leaking pipe, don’t wait for the damage to spread.
Contact our local, expert team today for a thorough camera inspection, and let us help you find the most reliable, cost-effective solution for your home. For more information on our complete range of plumbing services, check out The Ultimate Guide to Pipe Repair Salt Lake City.