
Is Your Home Leaking Money? How to Find Air Leaks in Your House
Learning to find air leaks in your house could be one of the most valuable things you do this year. According to ENERGY STAR, air leakage accounts for up to 40% of energy loss in American homes — and fixing it can cut your heating and cooling bills by an average of 15%.
Here’s a quick overview of how to find air leaks in your house:
- Visual inspection — Look for daylight around door and window frames, gaps in baseboards, and cracks where building materials meet
- Hand test — Run your hand (or a damp hand for extra sensitivity) along edges of windows, doors, outlets, and baseboards to feel for moving air
- Dollar bill test — Close a door or window on a dollar bill; if it slides out easily, the seal is failing
- Toilet paper or incense test — Hold tissue or lit incense near suspected gaps; movement or wavering smoke reveals a draft
- DIY pressurization test — Close all windows and doors, turn off combustion appliances, and run exhaust fans to depressurize the home; then use incense to find where air rushes in
- Thermal leak detector or IR camera — Scan walls, outlets, and frames for temperature differences that signal hidden leaks
- Professional blower door test — A certified technician depressurizes your home with a calibrated fan to find every leak, even ones hidden behind walls or under insulation
Most of these methods cost nothing or just a few dollars. The bigger leaks — especially in attics, basements, and ductwork — are often the ones worth finding first.
Think of your home like a sealed container. Every gap, crack, or hole is a slow drain on your comfort and your wallet. On a cold Utah winter day, those leaks aren’t just letting in cold air — they’re pushing your heated air straight outside. And most homeowners have no idea it’s happening, because the biggest leaks are usually hidden out of sight.
At Honest Home Services, we’ve spent over 20 years helping Northern Utah homeowners and businesses track down exactly these kinds of problems — from drafty windows to leaking ductwork — and we know how much of a difference sealing them can make. In this guide, we’ll walk you through everything you need to find air leaks in your house, from simple weekend tests to knowing when it’s time to call in a pro.
Must-know find air leaks in house terms:
Why You Need to Find Air Leaks in Your House
In May 2026, energy standards are more stringent than ever, and for good reason. Air leakage is the unintended transfer of air between the interior of your home and the outdoors. While it might seem harmless, it is responsible for up to 40% of the energy loss in American homes. When you find air leaks in house structures, you aren’t just fixing a draft; you’re repairing a hole in your household budget.
Uncontrolled airflow forces your HVAC system to work overtime. If your furnace or AC is constantly running but the house never feels quite right, you likely have air escaping through gaps you can’t see. Beyond the financial cost, these leaks allow dust, pollen, and outdoor pollutants to bypass your filtration system, significantly lowering your indoor air quality. According to the Department of Energy, detecting and sealing these leaks is one of the quickest ways to improve home performance.
The Impact on Your Utility Bills
The math is simple but startling: drafts caused by air leaks can add anywhere from 5% to 30% to your monthly energy bill. In Northern Utah, where our winters are freezing and our summers are scorching, that adds up to hundreds of dollars a year.
One of the biggest culprits is often overlooked: your ductwork. Research shows that leaky ductwork can be responsible for up to 30% of air loss. If your ducts are pulling in dusty attic air or blowing conditioned air into a crawlspace, you’re paying for comfort you never receive. If you suspect your ventilation system is part of the problem, our team provides expert ductwork services in Northern Utah to ensure your air stays where it belongs.
Comfort and Air Quality Benefits
Have you ever sat on your sofa and felt a random chill even though the thermostat says it’s 72 degrees? Those “cold spots” are usually the result of air infiltration. By sealing these gaps, you gain better control over your home’s humidity and temperature.
Furthermore, air leaks act as a highway for allergens. When air enters through cracks in the foundation or gaps in the attic, it often carries mold spores, VOCs, and fine dust. Sealing these entry points is a critical step in any indoor air quality solution, ensuring that the air your family breathes is filtered and fresh, not pulled from a dirty rim joist or crawlspace.
Common Locations and Signs of Home Drafts
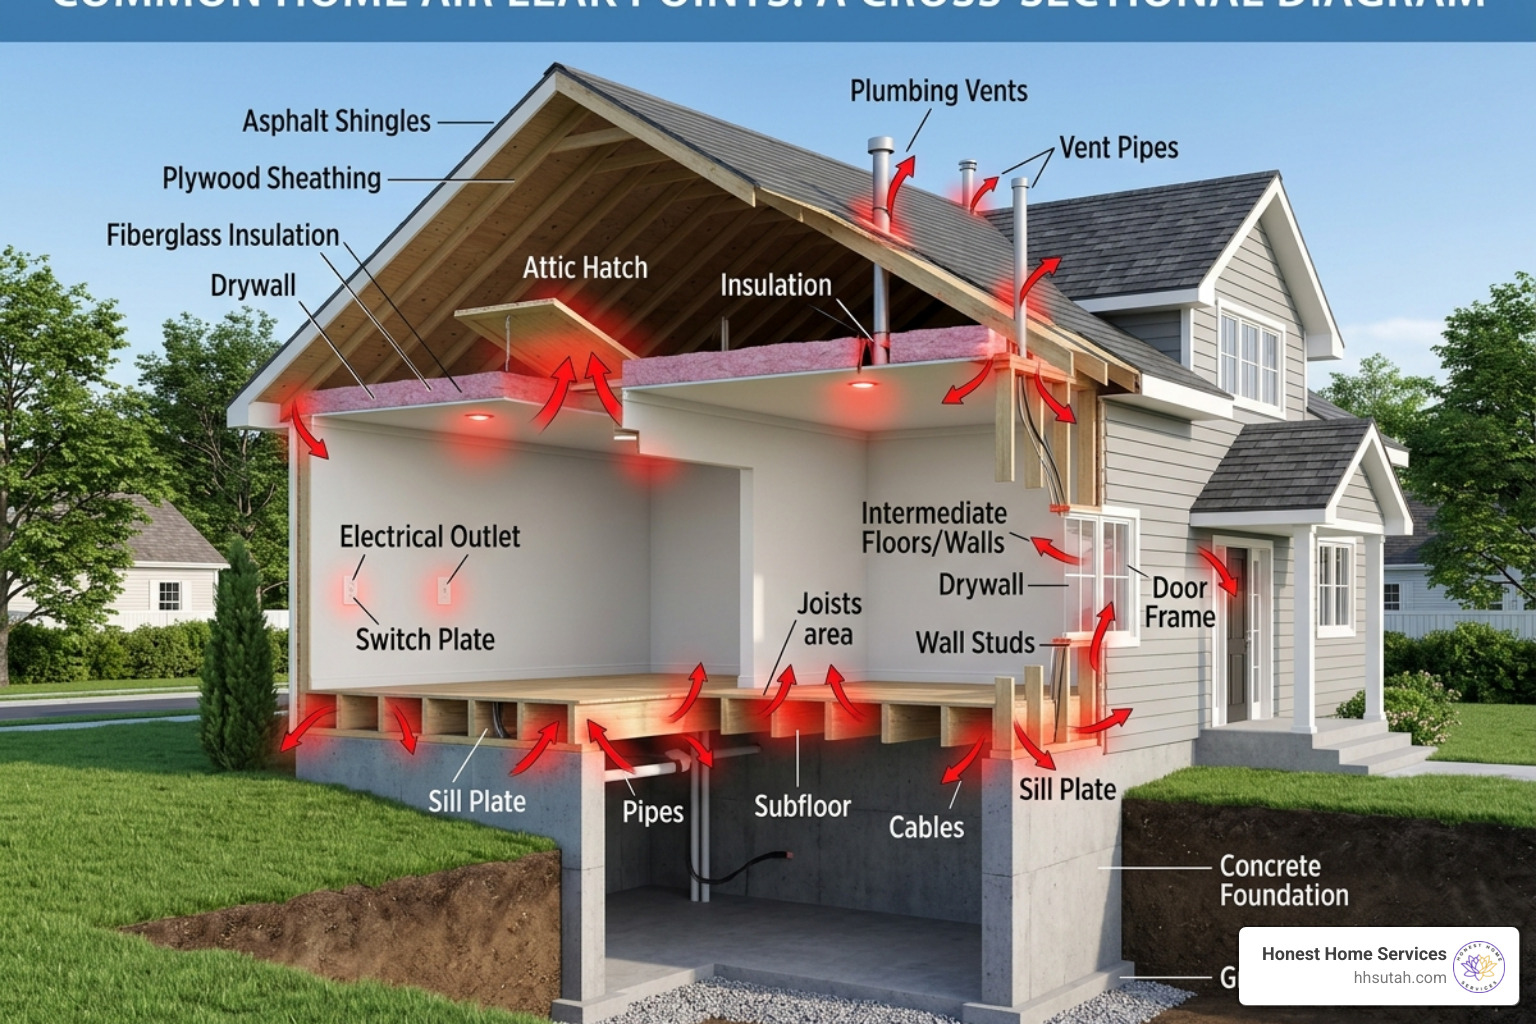
To effectively find air leaks in house perimeters, you have to know where to look. While windows and doors get all the blame, they are often just the tip of the iceberg. According to ENERGY STAR, the most significant leaks are often hidden in attics and basements.
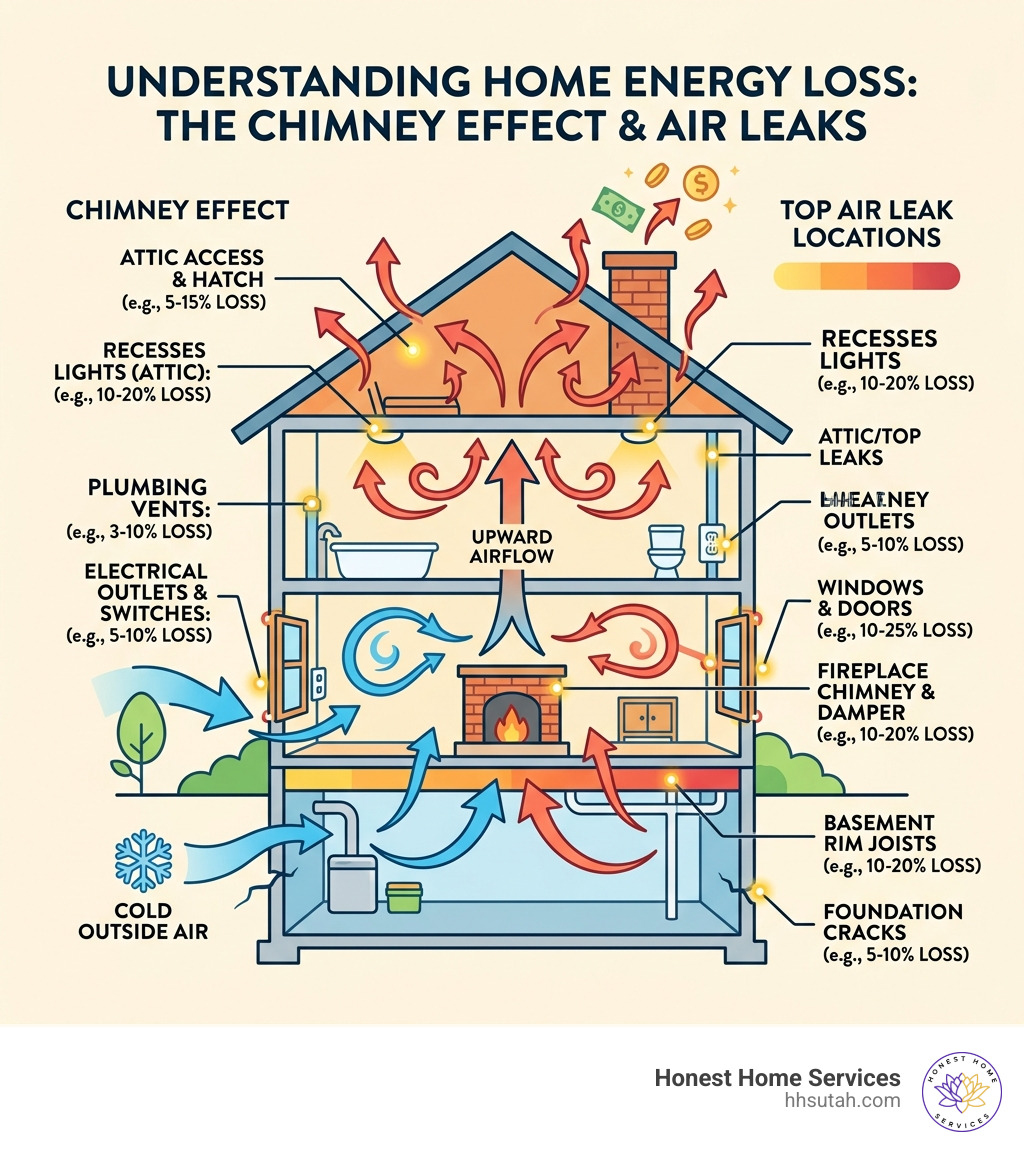
Common “leakage hotspots” include:
- Attic hatches and pull-down stairs: Often completely uninsulated and unsealed.
- Plumbing vents: The pipes that go through your roof often have large gaps around them in the attic.
- Recessed lighting: “Can” lights in the ceiling can act like small chimneys, sucking warm air out of your living room.
- Rim joists: In the basement, where the wood frame meets the concrete foundation.
- Electrical outlets and switch plates: Especially those located on exterior walls.
- Baseboards: Gaps between the floor and the wall.
Visual Cues to Find Air Leaks in Your House
You don’t always need high-tech gear to spot a problem. A simple walk-through can reveal a lot. Look for “daylight gaps” around door frames—if you can see the sun peeking through, air is definitely moving through.
Other visual signs include:
- Rattling windows: If they move in the wind, the seal is gone.
- Cobwebs: Spiders love to build webs where there is steady airflow to catch prey; if you see cobwebs in a corner, there’s likely a draft.
- Exterior cracks: Inspect where different building materials meet, such as where the siding meets the chimney or the foundation.
- Dirty insulation: In the attic, if you see fiberglass insulation that has turned black or grey, it’s acting as a filter for an air leak.
Physical Signs of Uncontrolled Airflow
Sometimes your body is the best detector. Uneven temperatures between rooms are a classic sign. If the kitchen is freezing but the living room is toasty, the kitchen likely has significant air infiltration.
High energy bills are the most obvious physical sign, but don’t ignore excessive dust. If you find yourself dusting every two days, your home might be sucking in outdoor particulates through leaks in the building envelope. As noted in our guide to hidden drafts, moisture on windows can also indicate that cold outdoor air is hitting warm indoor glass, signaling a nearby leak.
Simple DIY Tests to Detect Air Leaks

Ready to play detective? You can find air leaks in house structures using items you already have in your junk drawer. Before you start, turn off your HVAC system and any fans so the air in the house is still.
- The Hand Test: Dampen your hand with water. Your skin becomes much more sensitive to temperature changes and air movement when wet. Run it along windowsills and door frames.
- The Dollar Bill Test: This is one of the most useful things you can still do with a single dollar. Place the bill across a door or window seal and close it. If you can pull the bill out without any resistance, your weatherstripping is failing and needs replacement.
- The Toilet Paper Test: Hold a single square of toilet paper near a suspected leak. If it wavers or gets sucked against the crack, you’ve found a draft.
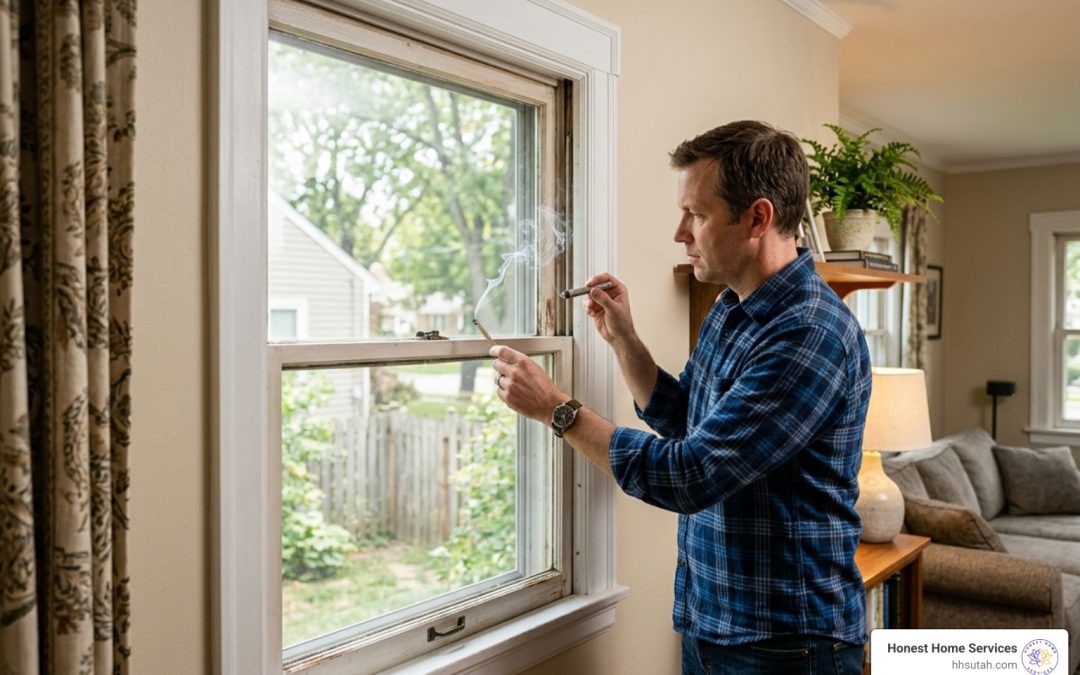
- The Incense or Smoke Test: On a windy day, light a stick of incense and move it slowly around the edges of windows, doors, and electrical outlets. If the smoke blows horizontally or swirls erratically, you’ve pinpointed a leak.
Using a DIY Pressurization Test to Find Air Leaks in Your House
If you want to get serious without hiring a pro yet, you can perform a DIY pressurization test. This mimics a professional blower door test by creating a pressure difference that “pulls” outside air through the leaks, making them much easier to find.
- Close all exterior windows and doors.
- Close all fireplace dampers and flues.
- Crucial Safety Step: Turn off all combustion appliances, including your gas water heater and furnace, to avoid “backdrafting” dangerous fumes into your home.
- Turn on all exhaust fans (bathroom fans, kitchen range hood).
- For extra power, seal a large box fan into an open window using cardboard and painters’ tape, blowing air out of the house.
- Walk around with an incense stick or your damp hand. The leaks will be much more obvious because the fans are actively sucking air in through every available crack.
Low-Tech Tools for the Modern Homeowner
For a nighttime inspection, use the Flashlight Test. Have one person stand outside in the dark while you shine a high-powered flashlight along the baseboards and door frames inside. If the person outside sees rays of light, you’ve found a structural gap.
| Method | Difficulty | Accuracy | Cost |
|---|---|---|---|
| Visual Inspection | Very Low | Low | $0 |
| Dollar Bill Test | Very Low | Medium (Doors/Windows) | $1 |
| Incense/Smoke Test | Low | High | <$5 |
| DIY Pressurization | Medium | Very High | $0 |
| Thermal Camera | High | Professional Grade | $200+ |
Advanced Tools and Professional Blower Door Tests
While DIY methods are great for finding big drafts, some leaks are invisible to the naked eye. This is where technology comes in. Handheld thermal leak detectors (which cost between $20 and $50) use infrared sensors to identify cold or hot spots on your walls. If you see a spot that is significantly colder than the rest of the wall in winter, there is likely a lack of insulation or a major air leak behind the drywall.
If you are dealing with persistent comfort issues in Salt Lake City or the surrounding areas, our leak detection services utilize professional-grade equipment to find what the “incense test” misses.
When to Schedule a Professional Blower Door Test
A professional blower door test is the gold standard. A technician mounts a powerful, calibrated fan into an exterior door frame. This fan depressurizes the house to a specific level (usually 50 pascals). The technician then measures the “ACH50” (Air Changes per Hour at 50 pascals).
You should consider a professional test if:
- You are planning a major energy efficiency upgrade.
- Your utility bills remain high despite DIY sealing.
- You have just purchased an older home in Davis or Salt Lake County.
- You want a “roadmap” of exactly where your energy dollars are escaping.
A pro doesn’t just find the leaks; they quantify them. They can tell you exactly how much air your house is losing, which helps you prioritize repairs. You can schedule an energy consultation with us to get a comprehensive look at your home’s performance.
High-Tech Detection for Hard-to-Reach Areas
Some of the worst leaks are in places you really don’t want to go—like cramped crawlspaces or the very edges of your attic. Professionals use theatrical fog machines or ultrasonic sensors to find these. By filling a pressurized house with non-toxic fog, you can literally see the “smoke” billowing out of the exterior of the house, showing exactly where the gaps are.
We also focus heavily on professional duct sealing. Since ducts are often hidden behind walls or under floors, we use specialized pressure-testing equipment to ensure your HVAC system isn’t wasting 30% of its effort before the air even reaches your living room.
How to Safely Seal Leaks Once Found
Once you find air leaks in house locations, it’s time to seal them up. The tool you choose depends on the size and location of the gap:
- Caulk: Best for small, stationary gaps (less than 1/4 inch) around window frames, baseboards, and where plumbing pipes enter walls.
- Weatherstripping: Use this for things that move, like the perimeter of doors and operable windows.
- Expanding Spray Foam: Ideal for larger, irregular gaps in the attic or basement (like around the rim joist or large pipe penetrations).
- Gaskets: Foam inserts that fit behind your electrical outlet and switch plates to stop drafts coming through the wall cavity.
Maintaining your home’s efficiency is an ongoing process. Regular HVAC maintenance ensures that once you’ve sealed the house, your system is running at peak performance to take advantage of the new, airtight envelope.
Balancing Air Sealing with Proper Ventilation
There is a common saying in the industry: “Seal tight, ventilate right.” While you want to stop uncontrolled air leaks, your home still needs fresh air to remain healthy. If you seal a house too tightly without considering ventilation, you can trap moisture, leading to mold, or cause “backdrafting,” where water heaters or fireplaces pull exhaust fumes back into the house.
In places like Farmington or Layton, where outdoor air quality can vary, we provide ventilation services that ensure you have controlled fresh air. This often involves Heat Recovery Ventilators (HRVs) that bring in fresh air while pre-heating or pre-cooling it using the air being exhausted, giving you the best of both worlds.
Prioritizing Your Sealing Projects
Don’t try to do everything at once. If you’re on a budget, follow this order of operations for the best ROI:
- The Attic: This is the most important area. Because warm air rises (the “chimney effect”), the attic is where most of your heat escapes in the winter.
- Basement/Crawlspace: Seal the rim joists and any foundation cracks.
- Ductwork: Ensure your “air highway” isn’t leaking.
- Windows and Doors: These feel like the biggest problems because you sit near them, but they are often secondary to the attic.
For those who want the job done right the first time, our expert leak detection and sealing team can handle the dirty work in those hard-to-reach attics and crawlspaces.
Frequently Asked Questions about Air Leakage
How much money can I save by sealing air leaks?
On average, homeowners save about 15% on heating and cooling costs. Depending on the size of your home in Northern Utah and how leaky it was to begin with, this can equate to $200–$500 per year. Most DIY sealing projects pay for themselves in less than one season.
Can a house be “too tight” after sealing?
Yes, it can. A house that is too tight without mechanical ventilation can suffer from high indoor humidity, lingering odors, and a buildup of indoor pollutants like radon or carbon monoxide. This is why professional testing is valuable—it ensures you reach the “sweet spot” of efficiency without sacrificing safety.
What is the best time of year to find air leaks?
Winter is the best time to find air leaks in house structures because the temperature difference between inside and outside is greatest. This makes drafts very easy to feel with a damp hand. However, a windy day in any season will also work well for smoke or incense tests.
Conclusion
Finding and fixing air leaks is one of the smartest investments you can make in your home. It’s a rare “win-win-win” scenario: you save money, you feel more comfortable, and you extend the life of your HVAC system. Whether you’re using a dollar bill to check your front door or calling us for a high-tech thermal scan, every leak you plug is a step toward a better home.
At Honest Home Services, we are proud to serve Northern Utah, including Salt Lake City, Layton, Kaysville, and beyond. Our expert technicians are dedicated to providing honest, reliable, and affordable solutions to keep your home running efficiently year-round. From 24/7 emergency support to guaranteed customer satisfaction, we’re here to help you win the war against drafts.
Ready to stop the drafts for good? Get more info about Salt Lake City leak detection services and let’s get your home sealed up tight!